All Categories
Featured
Table of Contents
- – Fifth Wheel Service Anaheim, CA
- – OCRV Center
- – Travel Trailer Window Replacement Anaheim, CA
- – Travel Trailer Service Anaheim, CA
- – Rv Trailer Service Near Me Anaheim, CA
- – Trailer Awning Replacement Anaheim, CA
- – Trailer Windows Replacement Anaheim, CA
- – Trailer Awning Replacement Anaheim, CA
- – Travel Trailer Floor Repair Anaheim, CA
- – Travel Trailer Floor Repair Anaheim, CA
- – Travel Trailer Floor Repair Anaheim, CA
- – Trailer Window Replacement Anaheim, CA
- – Rv Travel Trailer Repair Near Me Anaheim, CA
- – Rv Travel Trailer Repair Near Me Anaheim, CA
- – OCRV Center
Fifth Wheel Service Anaheim, CA
Motor homes offer fun, excitement, and a lot of adventurous possibilities. For all that they have to offer, they require routine attention in the type of maintenance and upkeep to maintain them looking and functioning at their prime for as long as feasible. Among one of the most vital points to keep an eye out for with camper trailers and Motor homes is water damage, as these vehicles by their very nature are typically exposed to the aspects.
If water invasion has triggered the wood framing of your RV or camper to splash, after that you'll need to allow it to completely dry out before covering it back over with timber floor covering. Enable open-air drying of framing products for a minimum of a week and after that use a mold-killing item such as a borax option to remove future rot concerns in the exact same location.
That stated, it is extremely crucial for mounting products to be completely dried prior to doing this or else you take the chance of developing a type of covering that urges rot in the timber beneath the seal. Permit three to four days for epoxy material to completely cure. Now that you have actually made sure to completely dry out and shield the mounting against future water breach, you can set out new floor covering.
I spent a couple of hours combing this online forum for info that would certainly aid me in replacing 2 substantial flooring locations in my 2011 MPG 181. Like I have actually reviewed so several of the purchasers did below, I acquired a travel trailer that had problems that I should have had the ability to diagnose and think about in my acquisition.
Travel Trailer Window Replacement Anaheim, CA
I haven't begun tearing into the floor yet as I wish to seek and dispatch the leaks initially to mitigate more water damages. Very little feeling in changing a flooring that will just get damp once again in the next rain or journey via a rainstorm. I did get some excellent info herein respective to what may be leaking and how to test for and repair the leakages.
Anyhow, any kind of help or assistance would certainly be considerably valued. I do intend on taking pictures and uploading them during this project to show those that might remain in the same watercraft, or in this case,, robo.
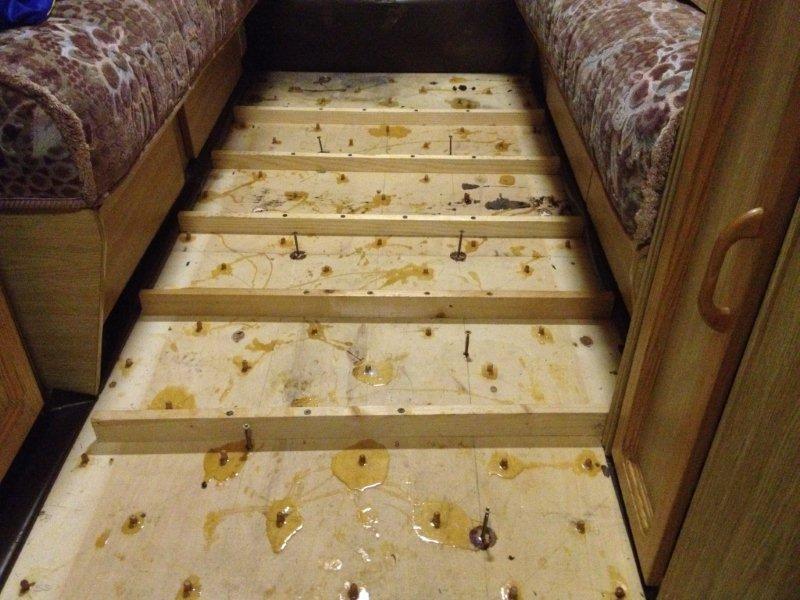
Identify sections displaying indicators of water damages, warping, or any kind of other concerns. This initial evaluation is essential for directing you in the subsequent repair work actions by helping you identify the particular products and tools required. By completely examining the condition of the floor covering, you can make educated decisions concerning the extent of the repair work and guarantee that you are sufficiently prepared.
Travel Trailer Service Anaheim, CA
Take the time to completely examine and assess the damage before embarking on the fixings to accomplish a lot more efficient and effective results. After evaluating the degree of the damage, acquire the essential materials and devices. Regular supplies for repairing traveling trailer floor covering incorporate plywood, plastic, or laminate flooring, sticky, and sealant.
This careful preparation makes sure that the repair can be lugged out with accuracy and without limitation from any kind of unnecessary products or blockages. Use a circular saw or jigsaw to diligently get rid of the jeopardized portions of the flooring. Perform accurate cuts to assure a seamless combination with the substitute materials.
Rv Trailer Service Near Me Anaheim, CA
Be thorough in making use of the cutting tools to preserve precision throughout the process, making certain that the new products fit well right into place. This precision is crucial for the overall success of the fixing, improving the durability and aesthetic cohesion of the restored flooring. Offer unique consideration to locations with water damage, as thorough and accurate cutting in these areas is crucial for protecting against any kind of possible concerns down the line.
Complying with the conclusion of the repair, guarantee proper ventilation for your traveling trailer. Open doors and windows to facilitate the blood circulation of fresh air, expediting the drying procedure and decreasing the possibility of mold and mildew or mold development. Allowing sufficient airflow is vital to advertising a healthy and balanced setting within the trailer, reducing the danger of dampness retention.
After the mended floor covering has completely dried and treated, restore your furniture and style into the traveling trailer. Seize this moment to restructure and invigorate the interior, crafting a welcoming space for your approaching adventures. With the repaired flooring giving a steady foundation, maximize this chance to improve the design and aesthetic appeals of your trailer.
A trusted repair work service can guarantee that your travel trailer is equipped to stand up to the diverse weather Michigan presents, from chilly winters months to warm summers. Investing effort and time right into the fixing procedure is an investment in the longevity of your traveling trailer, ensuring it continues to be a trustworthy buddy on your Michigan experiences.
Trailer Awning Replacement Anaheim, CA
Save on your own some time and difficulty and allow the pros at motor home Roofing Fixing Florida change your RV flooring. However, if you wish to do it on your own, we have actually got a couple of tips to make the process go smoother. Frequently, we see Recreational vehicles with 20-year-old carpets, plastic, or linoleum. Ripping out rug isn't all that challenging, however it's time taking in to select the staples.
These tack strips extend the border of your coach. When carpets is mounted, it's put on one tack strip and afterwards stretched to the contrary wall. Cut a slit in the rug and after that begin bring up so it divides from the strips to tear it out. As soon as the carpeting is pulled up, roll it up, and eliminate it from the train.
Trailer Windows Replacement Anaheim, CA
You may need two people to lift it. If you come across spots on your carpeting, hold your breath when you're drawing. Several older Recreational vehicles have decrease outs that go the entire method out whereas newer ones have decrease outs come out and then make the flooring flush.
If you desire to maintain going at it yourself, then tear up the tack strips and staples. If you don't get them all, you'll have bumps under your floor covering.
Trailer Awning Replacement Anaheim, CA
That occurs with peel and stick floor ceramic tiles. You'll discover staples in every edge of your instructor and your hands and fingers will certainly ache from pulling them all up. After they're full blast, sweep or vacuum up the debris and check for staples you missed the very first time.
You desire it complimentary of any bumps and load your gaps in with primer. It is very important to ensure that the floor covering is smooth, clean and there's no shiny paint left. Or else the floor covering may not stick. This component isn't very easy. Often you require a belt sander to get this done.
As you understand, water makes wood and wood laminate swell and contract. It's even far better to make sure that when you're all set to install the new floor covering that you offer it time to rest in the all-natural setting.
Travel Trailer Floor Repair Anaheim, CA
Guide can take a long time to completely dry. In Florida, it can take up to 3 hours with all the humidity. Since you prepare to put in the new floor, make certain it matches the interior. A lot of guys I see faced this trouble. They take down the new flooring just to find their significant other doesn't such as the shade since it doesn't match the indoor therapies.
After that, determine where you want the new flooring and determine it. Make sure you have the best color, pattern, dimension and measurements. From there, select a line that's square and set a chalk line so you get it good and straight. It is difficult since lines aren't constantly square. Currently start laying the drifting floorings one-by-one.
Also, it's finest to notch the floor covering and see to it you cut about door jams before you lay it down. It will not snap right into place otherwise. Do a dry fit to inspect (Travel Trailer Furniture Anaheim). If you're setting up drifting floors, you must recognize they may be devoured on one side and after that drift over the subfloor.
The floor covering is laid, make certain to trim it out so it looks finished. Currently that you understand all the actions involved in laying Motor home flooring, do you actually desire to spend your weekend doing unpleasant, unclean work?
Travel Trailer Floor Repair Anaheim, CA
A friend's camper has actually been dripping for a long time evidently and has decayed out the floor, ledger and joists. The regional camper sales/service area desired $200 ...
Identifying variables consist of size, flooring option, slide-out(s), and pre-existing damages below, and so on. Systems without slide-outs will certainly take around 20 to 60 labor hours ($4,000.00 $12,00.00). Please note: this price does include the expense of products and store materials. Slide-outs: 8 to 16 additional labor hours ($1,600.00 $3,200.00). Please note: this cost does include the expense of products and shop products.
Travel Trailer Floor Repair Anaheim, CA
Recreational vehicle furnishings is bolted in place. That furnishings will certainly continue to be inside, and our specialist will certainly relocate it from one side of the device to the various other as they work.
These products need to be gotten rid of and reinstalled extremely carefully. If we were to damage these things, we more than likely can not order a replacement. RV rug is NOT set up like a house with a tack strip. Your carpet is either glued down OR it's stapled in area with thousands of staples (literally, thousands) that need to be gotten rid of individually.
Trailer Window Replacement Anaheim, CA
Your brand-new floor selection is a large determining variable in your total labor price. It is far much less time consuming for our professionals to mount carpet or linoleum than it is to mount a hardwood/laminate floor covering that requires a professional to cut each plan, individually. There is additionally preparation work you can add to that conserves our technicians time.
***DO NOT EFFORT ANY PREPARATION FUNCTION PRIOR TO An ASSESSMENT. IF PREP WORK IS NOT FINISHED APPROPRIATELY, IT MAY CAUSE ADDITIONAL LABOR HOURS FOR OUR TECHNICIANS **Please call (209) 263-7040 and set up a motor home Flooring Consultation. The consultation sets you back $200.00. This will certainly be attributed to your recreational vehicle Floor Substitute job as soon as scheduled.
A couple of things to think about are the layout of your area, the problem of your subfloor, and the level of trouble to install your selected pattern. Armstrong has a acrylic grout that resists fracturing, stains, and remains adaptable during usage and in travel. If you want satisfaction that your floor covering is mounted appropriately, we suggest having a specialist flooring installer.
Your recreational vehicle, motorhome, camper or trailer has been your relied on friend on many experiences, but it also brings the scars of its trips. These could be in the type of water damages, rot, or basic damage on the recreational vehicle floor. Evaluating the extent of this damage is the very first step toward your location of a wonderfully redesigned lorry.
Rv Travel Trailer Repair Near Me Anaheim, CA
The presence of mold or mold is one more telltale indicator of water damage. Take the time to examine your existing configuration to, for instance, know if you need to change decayed wood floor covering.
You shouldn't make use of underlayment with any of these options as you can just utilize a floating flooring or adhere straight to the plywood. Laminate floor covering is like the all-terrain vehicle of the flooring worldit's flexible, economical, and simple to install. It's a popular selection amongst motor home owners thanks to its light-weight nature and the fact that it imitates the appearance of wood flooring.
Consequently, if you're considering this option, you'll need to secure it from water damage, especially if you have family pets or youngsters. If you're looking for a flooring alternative that's sturdy, water-resistant, and simple to tidy, plastic slab floor covering may be your best option. This is a well-rounded, flexible option since it withstands the components and is constructed to last.
Rv Travel Trailer Repair Near Me Anaheim, CA
With your tools, materials and plan in area, it's time to roll up your sleeves and dive into the meat of this job: getting rid of the old RV floor covering. This process can vary relying on the kind of floor covering you're handling. Plastic floor covering, carpet, and wood floor covering each require a different strategy.
To eliminate the old carpeting, adhere to these actions: Cut the carpeting into manageable areas making use of an utility blade. If your new floor covering install demands underlayment, you can recycle this. Use pliers or a carpeting puller to bring up the carpet sections (hold your horses, as this procedure can be time-consuming as a result of the number of staples utilized to safeguard the carpet) As soon as all the carpet is gotten rid of, utilize a staple lifter or oscillating multi-tool to remove any remaining staples Eliminating timber flooring is a little bit more complicated, yet it's nothing an intrepid DIYer can't take care of.
What does it mean to check the sub-floor? Search for any kind of indications of damage that can influence the flooring's stability, such as rot, mold and mildew, or water damages. If you discover any kind of signs of water damages, such as discoloration, bending, or mold and mildew, you'll need to address these concerns prior to continuing with the flooring setup.
If your sub-floor has considerable damage, repairing Occasionally, the damage to the sub-floor is so considerable that fixing simply the harmed sections isn't sufficient. In these instances, you'll need to change the entire sub-floor. If this holds true, it can be a much larger worry and time dedication. While it may be feasible to repair yourself, we advise seeing your local motor home service center to establish following steps to guarantee the integrity of your floor.
Travel Trailer Repairs Anaheim, CATravel Trailer Siding Repair Anaheim, CA
Rv Trailer Service Near Me Anaheim, CA
Trailer Window Replacement Anaheim, CA
Trailer Awning Replacement Anaheim, CA
Travel Trailer Repairs Anaheim, CA
Horse Trailer Repair Near Me Anaheim, CA
Travel Trailer Repairs Anaheim, CA
Trailer Window Replacement Anaheim, CA
Fifth Wheel Repair Near Me Anaheim, CA
Camper Floor Repair Near Me Anaheim, CA
Camper Floor Repair Near Me Anaheim, CA
Travel Trailer Awning Replacement Anaheim, CA
5th Wheel Repair Near Me Anaheim, CA
Travel Trailer Window Replacement Anaheim, CA
Camping Trailer Repair Near Me Anaheim, CA
Rv Trailer Repair Near Me Anaheim, CA
Trailer Floor Repair Anaheim, CA
Trailer Awning Replacement Anaheim, CA
Travel Trailer Window Replacement Anaheim, CA
Travel Trailer Floor Repair Anaheim, CA
Trailer Window Replacement Anaheim, CA
Cargo Trailer Repair Anaheim, CA
Cargo Trailer Repair Anaheim, CA
Trailer Awning Replacement Anaheim, CA
Rv Trailer Repair Near Me Anaheim, CA
Travel Trailer Window Replacement Anaheim, CA
Travel Trailer Floor Repair Anaheim, CA
Rv Trailer Repair Near Me Anaheim, CA
Travel Trailer Ceiling Repair Anaheim, CA
Camper Trailer Service Anaheim, CA
Horse Trailer Repairs Anaheim, CA
Horse Trailer Repairs Anaheim, CA
5th Wheel Repair Near Me Anaheim, CA
Travel Trailer Service Anaheim, CA
Travel Trailer Replacement Windows Anaheim, CA
Fifth Wheel Service Anaheim, CA
Cargo Trailer Repair Anaheim, CA
5th Wheel Repair Near Me Anaheim, CA
Travel Trailer Floor Repair Anaheim, CA
Travel Trailer Roof Replacement Anaheim, CA
Travel Trailer Siding Repair Anaheim, CA
Camping Trailer Repair Near Me Anaheim, CA
Rv Trailer Repair Near Me Anaheim, CA
Trailer Window Replacement Anaheim, CA
Trailer Roof Repair Anaheim, CA
Cargo Trailer Repair Anaheim, CA
Horse Trailer Repairs Anaheim, CA
Travel Trailer Furniture Anaheim, CA
Travel Trailer Repairs Anaheim, CA
Fifth Wheel Service Anaheim, CA
Travel Trailer Ceiling Repair Anaheim, CA
Rv Trailer Repair Shops Near Me Anaheim, CA
Rv Trailer Repair Near Me Anaheim, CA
Fifth Wheel Service Anaheim, CA
Travel Trailer Ceiling Repair Anaheim, CA
Travel Trailer Replacement Windows Anaheim, CA
Travel Trailer Roof Replacement Anaheim, CA
Rv Trailer Repair Shop Anaheim, CA
Trailer Awning Replacement Anaheim, CA
Travel Trailer Siding Repair Anaheim, CA
Trailer Roof Repair Anaheim, CA
Horse Trailer Repairs Anaheim, CA
Travel Trailer Roof Replacement Anaheim, CA
Travel Trailer Siding Repair Anaheim, CA
Rv Travel Trailer Repair Near Me Anaheim, CA
Travel Trailer Service Anaheim, CA
Horse Trailer Repair Near Me Anaheim, CA
Camper Trailer Service Anaheim, CA
Fifth Wheel Service Anaheim, CA
Rv Trailer Repair Shop Anaheim, CA
Fifth Wheel Service Anaheim, CA
Horse Trailer Repairs Anaheim, CA
Fifth Wheel Service Anaheim, CA
5th Wheel Repair Near Me Anaheim, CA
Travel Trailer Window Replacement Anaheim, CA
Horse Trailer Repair Near Me Anaheim, CA
Travel Trailer Repairs Anaheim, CA
Find Seo Services For Small Business Anaheim, CA
Around Me Seo Consultant Anaheim, CA
OCRV Center
Table of Contents
- – Fifth Wheel Service Anaheim, CA
- – OCRV Center
- – Travel Trailer Window Replacement Anaheim, CA
- – Travel Trailer Service Anaheim, CA
- – Rv Trailer Service Near Me Anaheim, CA
- – Trailer Awning Replacement Anaheim, CA
- – Trailer Windows Replacement Anaheim, CA
- – Trailer Awning Replacement Anaheim, CA
- – Travel Trailer Floor Repair Anaheim, CA
- – Travel Trailer Floor Repair Anaheim, CA
- – Travel Trailer Floor Repair Anaheim, CA
- – Trailer Window Replacement Anaheim, CA
- – Rv Travel Trailer Repair Near Me Anaheim, CA
- – Rv Travel Trailer Repair Near Me Anaheim, CA
- – OCRV Center
Latest Posts
Fleet Service Santa Ana
Truck Service Santa Ana
Truck Repairs Brea
More
Latest Posts
Fleet Service Santa Ana
Truck Service Santa Ana
Truck Repairs Brea