All Categories
Featured
Table of Contents
- – Rv Air Conditioner Repair Near Me East Irvine, CA
- – OCRV Center
- – Motorhome Generator Repair East Irvine, CA
- – Onan Generator Repair East Irvine, CA
- – Motorhome Air Conditioner Repair East Irvine, CA
- – Rv Window Repair Near Me East Irvine, CA
- – Rv Air Conditioner Repair Near Me East Irvin...
- – Rv Windshield Repair Near Me East Irvine, CA
- – Rv Mechanic East Irvine, CA
- – Rv Mechanic East Irvine, CA
- – Rv Windshield Repair Near Me East Irvine, CA
- – Rv Mechanic East Irvine, CA
- – Rv Air Conditioning Repair East Irvine, CA
- – Rv Mechanic Near Me East Irvine, CA
- – Rv Repair Shops Near Me East Irvine, CA
- – OCRV Center
Rv Air Conditioner Repair Near Me East Irvine, CA
New insulation can likewise be put on top if required. Be advised that removing the existing membrane will certainly set off Structure laws Component L, which would certainly need a complete roof covering and insulation upgrade and replacement (Rv Generator Repair Near Me East Irvine). Leakages are spotted in one or more areas of the flat roof covering membrane As above, the cause might be an age-related failure of the membrane or slits
Repairing your gutters should be a top priority, before making any repairs to your flat roofing. See much more about the sources of dripping rain gutters and exactly how to stop them. It is recommended to likewise examine the degree of any type of damage to the inner structure (insulation and decking). If considerable water access has actually taken place, more considerable roof covering job may be needed.
These can include however are not limited to: (1) bad product specification, (2) incorrect or low-grade ingredients, (3) installment during wet or wet conditions and (4) incorrect layout. Ideally, damage to the roofing will be repaired before the leakage has spread out. However, this relies on the size of time that the leakage has actually been exposed to rainwater.
If the roofing system is dripping however there is no evident indicator, it is feasible that the boundary outlining is the resource. This can be the lead flashing or the truth that the side trims are exposing the roof framework (an usual reason for dripping when it rainfalls with wind). The adhering to gallery is planned to show some of the leaking level roofings run into by Strandek.
Motorhome Generator Repair East Irvine, CA
Side view image showing an improperly installed EDPM single ply rubber roofing system. The roof has a damage in the rubber and is not effectively glued to the lumber outdoor decking.
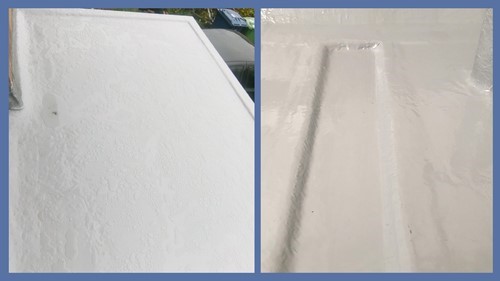
Clean with acetone and use brand-new coat of flow coat at max price of 0.5 Kg/sq. m. Note that the home window itself is revealing indicators of water access. In this instance it is recommended to get in touch with the distributor. Clearly shows additional application of flow having been directly put on unprepared existing circulation layer.
In addition, the surface area appearance of the laminate generally is extremely bad and inconsistent recommending low ability degrees in this area. Suggests that base resin and matting have been applied yet without combining with a paddle roller leaving an inappropriate appearance to the roof with adjoining layers creating raised degrees.

The entire roof covering surface must be completely sanded back to break via the existing circulation layer surface area, eliminating any type of lips and bumps. Not always a leak, but could lead to one.
Onan Generator Repair East Irvine, CA
Please keep in mind that this does not represent advice and is for informative purposes only. Both Material Library and Strandek are not responsible for any kind of results (Rv Generator Repair Near Me East Irvine). Constantly get in touch with specialist suggestions. Roof is dangerous work. The following area offers a basic overview on how to fix a fibreglass level roof covering using a fibreglass repair work kit.
Fibreglass (GRP) roofing kits are readily available in a variety of sizes. They consist of adequate products and tools needed to make a reliable repair work.
Note: Whilst fibreglass roof covering repair service kits are flexible and appropriate for a variety of roof structures. Examine the surface areas that the fibreglass repair work can be made to.
Motorhome Air Conditioner Repair East Irvine, CA
Thinking the underlying framework has been repaired and is in excellent physical problem, a number of steps should be followed: this implies finding any kind of infiltration in the existing roof membrane layer. In general, if the leak is more of a slit that's happened lately and with little to no rain, it can be patched over the listed below guidelines use here.
In such a case, a full substitute is called for. Note: permit the roof to dry out. Before starting any type of work the roofing location ought to be completely dry. Moist or damp regions need to be permitted to dry. Note: it is suggested to cover this location in a plastic cover during periods of rains up until it can be repaired.
Keep in mind: attempts to bond the resin to a damp or wet surface area need to be prevented as this will certainly restrict attachment considerably. roof membrane layer around the repair area that is loose, infected or harmed must be evaluated for damages and eliminated appropriately. Usage sandpaper to scale back the membrane to develop a flatter surface area prior to repair.
Guides are created to assist in bonding between the substratum (e.g. existing fibreglass or plywood) and the fibreglass laminate. Apply guide in a thin layer over the repair work region. Whilst this is optional, it does enhance the bond of the polyester resin to the region undergoing repair. PorosityPrimer Coverage (kg per m2)ToolNote Low Porosity0.25 Polyester rollers (larger areas) or a material brushes (smaller/complex areas) recommended.
Rv Window Repair Near Me East Irvine, CA
High Porosity > 0.5 If porosity is high, after that much more primer is required, since the fluid will certainly participate in the pores. dimension and reduced the CSM. 600 gram CSM is advised, although lighter 450 g CSM is also offered. Applicators must reduce and size the CSM into a size that goes beyond the existing area of the repair service area by around 10 20 %.
Note: freshly catalysed resin should be utilized quickly. Keep in mind: guarantee that the resin-catalyst mix is thoroughly however completely mixed.
Rv Air Conditioner Repair Near Me East Irvine, CA
Excess air triggers bubbles, which deteriorate the laminate. Keep in mind: this step should be executed when the weather condition is completely dry; water and even low levels of moisture interfere with the healing procedure.
Suggested time: 12 hours (wintertime) and 6 hours (summertime). Secure the repair service with appropriate insurance coverage in the occasion of rains. once the laminate has solidified, prepare the overcoat. This includes blending it with a driver very carefully to avoid bubble development. Keep in mind: to match the colour of your overcoat, make use of a dye.
Rv Windshield Repair Near Me East Irvine, CA
To prepare the overcoat: put a single layer of topcoat material onto the laminated concrete surface. Take care to avoid using too much as this will certainly produce a fragile outer surface area.
Surface (m2)Overcoat Weight (kg) 10.5 21 31.5 42.0 52.5 Note: describe the maker's instructions, but a harsh quote would recommend 0.5 kg per square meter of laminate. If you would such as to buy a repair work kit without topcoat, please see our Fibreglass Fixing Kits. when the overcoat has actually been applied, offer appropriate time for it to treat and solidify.
Rv Mechanic East Irvine, CA
A number of regulations are appropriate when thinking about the construction of a flat roof. These apply to fibreglass (GRP) flat roofs as well as various other systems like really felt, EPDM and asphalt.
Dealing with a level roofing threatens and treatment must be taken to make certain the safety of all celebrations entailed. The UK HSE provides advice on the complying with dangers connected with flat roof work: Asbestos is a major factor to consider in roofing specifically on buildings installed pre-2000, where it was still used.
Rv Mechanic East Irvine, CA
Chemicals: polyester resin and MEKP stimulant provide some level of risk. A COSHH type should be completed ahead of time to make sure the dangers of linked chemicals are properly taken care of. A threat assessment and that thinks about the aforementioned risks and assesses the likelihood of a case happening must be finished.
Generally, it would be recommended to utilize the exact same product to repair the roofing. Nevertheless, if the repair service entailed the full removal of the existing membrane, then fibreglass might be utilized. A fundamental fibreglass flat roofing setup price is around 60 80 per square meter. Resin Collection offers detailed overviews are offered online for installers covering how to construct a fibreglass roofing system from square one.
From below, you can take the following steps to ensure a water tight coating. very carefully to determine indications of damage and intend a repair technique appropriately. to make certain a solid bond between the old roof and the brand-new repair work material. according to the maker's directions and use it to the broken location, filling it in completely.
Rv Windshield Repair Near Me East Irvine, CA
With your materials prepared and damage control total, it's time to prepare the level roofing system for repair by cleaning and keying the area around the damage. This step is important in ensuring a strong bond in between the old roofing system and the new repair service product. To prepare the location, you'll require to make use of a disc sander to cleanse down the sides of the repair service zone and remove interfering damage product.
Verify the surface is tidy, completely dry, and cost-free of pollutants prior to applying the repair mix. Cleaning up the repair work area entails two essential steps: First, make use of a disc sander to get rid of meddlesome damages product and smooth out the sides of the repair service zone.
You'll desire to cleanse a location of regarding 2-3 inches in circumference around the damage to key the zone. Next, get hold of some Acetone and clean the area to get rid of any kind of obstructions.
Rv Mechanic East Irvine, CA
By doing so, you'll be creating a strong structure for the fixing. Currently that the repair service area is clean and devoid of particles, it's time to blend the repair service blend that will bond with the existing roof covering. This mixture is important to an effective repair, as it will complete the broken area and give a strong, watertight seal.
Mix the blend extensively up until it's smooth and constant. If you're making use of a fiberglass mat or slice strand, sufficed to dimension and include it to the mix, making certain it's completely saturated. Now that your repair service combination is ready, you're one step more detailed to a successful roofing system repair work. Applying the freshly blended repair service combination to the broken area, you'll wish to load it in totally, making sure to press it firmly into the sides and corners to remove any kind of air pockets.
Rv Air Conditioning Repair East Irvine, CA
Make specific to fill up the location somewhat above the bordering surface area, as the blend will diminish a little as it dries. Use a degree or straightedge to validate the loaded location is even and smooth. If necessary, utilize a wet fabric to eliminate any kind of excess mix that has squeezed out past the broken location.
With your materials prepared and damage control full, it's time to prepare the level roofing system for fixing by cleansing and keying the location around the damage. This action is crucial in assuring a strong bond between the old roof covering and the brand-new fixing product. To prepare the location, you'll require to make use of a disc sander to clean down the sides of the repair zone and get rid of noticeable damages material.
Sand a location of 2-3 inches in area around the damages to key the zone, but stay clear of fining sand down past the fibreglass under-layer. Prepare the area for bonding by getting rid of any type of obstructions. Validate the surface area is tidy, dry, and without impurities prior to using the repair service blend. Cleaning the repair service area includes 2 important actions: First, use a disc sander to remove interfering damages material and ravel the edges of the repair zone.
Rv Mechanic Near Me East Irvine, CA
As you sand, ensure not to sand down past the fibreglass under-layer. You'll intend to clean up an area of concerning 2-3 inches in circumference around the damage to key the zone. Next, order some Acetone and clean the area to eliminate any obstructions. This will guarantee a strong bond in between the new product and the existing roofing.
By doing so, you'll be creating a solid foundation for the fixing. Since the repair work area is clean and free of particles, it's time to blend the repair work mix that will certainly bond with the existing roofing. This blend is vital to an effective fixing, as it will certainly fill up in the damaged location and offer a solid, leak-proof seal.
Rv Repair Shops Near Me East Irvine, CA
Mix the mix completely till it's smooth and consistent. If you're making use of a fiberglass floor covering or chop hair, sufficed to size and add it to the mixture, seeing to it it's totally saturated. Now that your repair work blend prepares, you're one action more detailed to an effective roof repair work. Applying the freshly mixed repair service mixture to the damaged area, you'll intend to load it in entirely, making certain to press it securely right into the edges and corners to remove any type of air pockets.
OCRV Center
Address: 23281 La Palma Ave Yorba Linda, CA 92887Phone: (714) 909-1444
Email: [email protected]
OCRV Center
Ensure to fill the location a little above the surrounding surface, as the blend will shrink a little as it dries. Use a degree or straightedge to confirm the filled up area is even and smooth. If needed, use a moist fabric to remove any type of excess mixture that has actually pressed out beyond the damaged location.
Rv Fridge Repair East Irvine, CARv Ac Repair East Irvine, CA
Norcold Repair East Irvine, CA
Motorhome Repair Shop Near Me East Irvine, CA
Rv A/C Repair Near Me East Irvine, CA
Motorhome Repair Shop Near Me East Irvine, CA
Rv Mechanic East Irvine, CA
Norcold Refrigerator Repair East Irvine, CA
Rv Repair Shops Near Me East Irvine, CA
Norcold Repair East Irvine, CA
Rv Repair Shops East Irvine, CA
Rv Repair Shops East Irvine, CA
Rv Window Repair Near Me East Irvine, CA
Rv Windshield Repair Near Me East Irvine, CA
Rv Repair Shops East Irvine, CA
Rv Ac Repair East Irvine, CA
Rv Windshield Repair Near Me East Irvine, CA
Rv Engine Repair Near Me East Irvine, CA
Onan Generator Repair East Irvine, CA
Rv Window Repair East Irvine, CA
Rv Repair Shops East Irvine, CA
Motorhome Air Conditioner Repair East Irvine, CA
Rv Fridge Repair East Irvine, CA
Rv Repair Shops East Irvine, CA
Motorhome Generator Repair East Irvine, CA
Rv Engine Repair Near Me East Irvine, CA
Rv Windshield Repair East Irvine, CA
Rv Air Conditioner Repair Near Me East Irvine, CA
Rv Repair Shops East Irvine, CA
Rv Repair Shops East Irvine, CA
Rv Window Repair Near Me East Irvine, CA
Fiberglass Roof Repair East Irvine, CA
Rv Mechanic Near Me East Irvine, CA
Rv Mechanic Near Me East Irvine, CA
Rv Windshield Replacement East Irvine, CA
Rv Air Conditioner Repair East Irvine, CA
Motorhome Generator Repair East Irvine, CA
Rv Windshield Repair Near Me East Irvine, CA
Motorhome Repair Shop Near Me East Irvine, CA
Emergency Rv Repair Near Me East Irvine, CA
Rv Windshield Replacement East Irvine, CA
Motorhome Generator Repair East Irvine, CA
Motorhome Air Conditioner Repair East Irvine, CA
Rv Ac Repair East Irvine, CA
Rv Windshield Replacement East Irvine, CA
Rv A/C Repair Near Me East Irvine, CA
Rv Windshield Replacement East Irvine, CA
Rv Repair Shops East Irvine, CA
Rv Repair Shops Near Me East Irvine, CA
Motorhome Air Conditioner Repair East Irvine, CA
Rv Generator Repair Near Me East Irvine, CA
Rv Ac Repair East Irvine, CA
Rv Repair Shops East Irvine, CA
Rv Repair Shops East Irvine, CA
Rv Generator Repair Near Me East Irvine, CA
Rv Engine Repair Near Me East Irvine, CA
Rv Air Conditioner Repair East Irvine, CA
Rv Air Conditioner Repair East Irvine, CA
Rv Generator Repair Near Me East Irvine, CA
Motorhome Generator Repair East Irvine, CA
Rv A/C Repair Near Me East Irvine, CA
Rv Ac Repair East Irvine, CA
Rv Mechanic East Irvine, CA
Motorhome Repair Shop Near Me East Irvine, CA
Rv Service And Repair East Irvine, CA
Motorhome Generator Repair East Irvine, CA
Onan Generator Repair East Irvine, CA
Norcold Repair East Irvine, CA
Norcold Rv Refrigerator Repair East Irvine, CA
Rv Repair Shop Near Me East Irvine, CA
Rv Windshield Repair East Irvine, CA
Dometic Refrigerator Repair East Irvine, CA
Emergency Rv Repair Near Me East Irvine, CA
Motorhome Generator Repair East Irvine, CA
Rv Repair Shops East Irvine, CA
Rv A/C Repair Near Me East Irvine, CA
Dometic Refrigerator Repair East Irvine, CA
Motorhome Generator Repair East Irvine, CA
Affordable Seo Specialist East Irvine, CA
Finding A Good Local Seo Plans East Irvine, CA
Rv Generator Repair Near Me East Irvine, CA
OCRV Center
Table of Contents
- – Rv Air Conditioner Repair Near Me East Irvine, CA
- – OCRV Center
- – Motorhome Generator Repair East Irvine, CA
- – Onan Generator Repair East Irvine, CA
- – Motorhome Air Conditioner Repair East Irvine, CA
- – Rv Window Repair Near Me East Irvine, CA
- – Rv Air Conditioner Repair Near Me East Irvin...
- – Rv Windshield Repair Near Me East Irvine, CA
- – Rv Mechanic East Irvine, CA
- – Rv Mechanic East Irvine, CA
- – Rv Windshield Repair Near Me East Irvine, CA
- – Rv Mechanic East Irvine, CA
- – Rv Air Conditioning Repair East Irvine, CA
- – Rv Mechanic Near Me East Irvine, CA
- – Rv Repair Shops Near Me East Irvine, CA
- – OCRV Center
Latest Posts
Glendora Web Design
Local Seo Services Near Me Jurupa Valley
Internet Marketing Services Pomona
More
Latest Posts
Glendora Web Design
Local Seo Services Near Me Jurupa Valley
Internet Marketing Services Pomona