All Categories
Featured
Table of Contents
- – Rv Roof Repair Near Me Corona, CA
- – OCRV Center
- – Best Rv Roof Repair Corona, CA
- – Rv Roof Leak Repair Near Me Corona, CA
- – Resealing Rv Roof Corona, CA
- – Rv Roof Repair Fiberglass Corona, CA
- – Motorhome Roof Replacement Corona, CA
- – Rv Roof Repair Fiberglass Corona, CA
- – Rv Roof Maintenance Corona, CA
- – Rv Slide Out Roof Repair Corona, CA
- – Rv Roof Repair Corona, CA
- – Rv Rubber Roof Replacement Corona, CA
- – Repair Rv Roof Leak Corona, CA
- – Rv Trailer Rubber Roof Repair Corona, CA
- – OCRV Center
Rv Roof Repair Near Me Corona, CA
Make sure the caulk around the joints is solid and uncracked. Don't be worried to use a little added if it appears like it's obtaining a little old/weak.: Among the very best ways to prevent leaks is to keep your motor home covered whenever it's not being used. This can protect against all type of troubles like UV damages, black streaks, and roofing leakages!: Don't park your RV in an area where it will be exposed to constant water.
If you read this, you could have found that your recreational vehicle/ Camper is dripping and water is currently getting where it's not intended to be. Water could not feel like a significant issue yet we understand at Travers St. Louis Recreational Vehicle/ Camper Solution & Body that also a little leak can develop major issues like black mold growth on fiberglass, rust on steel, and mildew damages.
Travers St. Louis RV/ Camper Service & Body designed a motor home/ Camper Leak Fixing & Upkeep Solution to keep every part that aids avoid water from getting in. Areas like the windshield, tires, and lights will certainly be checked to identify and repair any type of minor problems prior to they can leave hand.
Travers St. Louis Motor Home/ Camper Service & Body is comfortably located in the St. Louis city and is within a brief drive from O'Fallon, St. Peters, St. Charles & Chesterfield, MO. If you live in the area and have a RV/ Camper with a leakage, then the very best RV/ Camper Leakage Repair & Maintenance Service is easily offered conveniently and at competitive rates.
Best Rv Roof Repair Corona, CA
Below's a basic detailed overview to fixing RV roof leaks.: Locate the source of the leakage. If this isn't easy to spot, then you can enlist the assistance of a specialist to execute a smoke test, or you can perform a do it yourself air pressure test.: Check out the damages and figure out the reason.
Before beginning, first, see to it that your product works with your roofing system material and completely discuss any kind of instructions included. The basic 4-step method includes: the existing water leakages using the approach above the whole roofing surface area making use of a RV roofing cleaning product and a tight broom. Then, power-wash the roofing and allow it dry thoroughly.
Rv Roof Leak Repair Near Me Corona, CA
Use a 2nd coat in the exact same fashion, other than this time roll in the contrary instructions. Be certain to completely stir the mix prior to you apply it. Rv Slide Out Roof Repair Corona.
Your recreational vehicle is a home on wheels, whether for a number of days each time or all year round. Like a home, the water supply can leakage, such as the fresh water tank or the hot water heater. A motor home is additionally much more vulnerable to certain leakages, such as in the roofing system, considering that it is mobile and has a more light-weight design than your home.
Resealing Rv Roof Corona, CA
Your Recreational vehicle is a considerable investment. Here are a few factors inspections and repairs matter: When you inspect your Motor home consistently, you can capture issues like leakages prior to they cause extensive damage to your interior.
Water leaking from the cooling device outside the motor home is normal during operation. The water ought to adhere to a details course down the networks on the roofing that lead it down to either the forward or aft edge of the rig. If you see water leaking inside or dripping in one more area outside, that might represent a concern with the system.
Rv Roof Repair Fiberglass Corona, CA
Plumbing leakages can show up in the storage area. Sometimes, water damage presents evident indicators, but you may not discover it instantly in various other situations.
They might additionally lower resale value. Before you begin the process of camper leakage repair work, you need to locate the source. Adhere to these actions to identify the leakage's beginning point: Check the roof, wall surfaces, ceilings and doors to locate any areas with worn or broken seals and caulking. Examine the wall surfaces and floorings for any soft areas.
Motorhome Roof Replacement Corona, CA
Take a look at any type of noticeable plumbing pipes and installations for rust, trickling or damp areas. Run water through the taps and look for leaking water at the connections. Take a look at wastewater and freshwater systems for cracks or leakages in the storage tanks, links and hose pipes. Smell for stuffy smells to find where they originate.
Spray particular areas while somebody else stands inside the camper to see where water obtains in. A flashlight illuminates the space for much more effective examination in confined, dark areas like cabinets and pipes fixtures. This gadget links to hoses to inspect for abnormal stress drops that might show a leak.
The procedure of fixing water damages takes several actions. Right here is exactly how to deal with water damages in a camper: Locate the resource of the leakage and seal from the exterior.
Take out the damaged location and various other elements. Use dehumidifiers and fans to dry the location. Take care of rotten or damaged framework, step electric cords to the appropriate positions and add insulation.
Rv Roof Repair Fiberglass Corona, CA
Usage mineral spirits, isopropyl alcohol or acetone to prepare the surface area for the brand-new sealer. Only usage acetone on fiberglass surface areas as it can harm rubber. Put RV-grade sealer over all the components you need to cover. The roof covering will need self-leveling sealer. Apply a grain of sealant, then utilize your finger or a caulking tool to smooth it down.
Peel off the tape when you finish resealing, and let the sealer cure for 24 hr. Walk around the camper one last time to examine your work. Weather condition can reveal existing leaks or trigger motor home damages that produces leakages. In rainfall and hefty downpours, rain might seep into seams on the roofing system and around home windows and doors.
Rv Roof Maintenance Corona, CA
Snow, ice and warm can likewise all generate structural damage that leads to leakages by creating materials to increase and agreement. Cold can make water lines or pipes burst. The very best means to stay clear of camper water damage is to capture and repair leakages early. Utilize the following upkeep tips to maintain your rig in leading form: Check the roofing system.
Winterize your RV to prevent freezing. Store your RV in a covered area to shield it from the elements. A yearly evaluation enables you to keep an eye on any type of locations that could leak, from your plumbing system to your roof.
KOA began in 1962 and supplies expertise of the outdoor camping sector in every information, from Recreational vehicle repairs to journey planning. Each camping site has pleasant individuals in yellow shirts anxious to make your outdoor camping experience the ideal it can be.
Rv Slide Out Roof Repair Corona, CA
You can anticipate KOA and its team to sustain you in every interaction. With your leaks fixed and the damage restored, you are prepared to head out on your following journey in your Recreational vehicle.
Established in Payments, MT in 1962, KOA's family members of camping site brands KOA Trip, KOA Holiday and KOA Hotel today offer even more than a million camping households every year. KOA is committed to "linking individuals to the outdoors and each various other" by offering people with a variety of camping experiences and the details they require to make the most of their outdoor camping trip.
Next up is picking the proper sealant for your task. There are a great deal of sealants out there to select from and we're going to introduce you to the ones that we utilize at Recreation Coachworks.
Rv Roof Repair Corona, CA
ProFlex clear sealer takes place a painted exterior so it does not cover the paint job. Sikaflex 221 is white. It's for white exteriors and can be made use of on the whole trainer. Going on to roof covering sealers we have an Alpha sealant for a TPO rubber roofing. The XTRM self-leveling sealer is used on PVC roofing systems.
Roof coverings in specific have a whole lot of possible leak locations. A roof joint and the area around a screw might require various roofing system sealers.
Some windows aren't entirely sealed, however it's still important to maintain the seals that are needed. Walk around your entire Motor home and check every area of transition or infiltration.
Make it a priority to know where you have motor home sealants and what areas go to danger for fractures and various other damages. Recognizing with the area of all of your sealants makes your sealant check both quick and efficient. Doing that thorough check (it can take just 15 mins) two times a year can conserve you from the aggravation and cost of a significant water damages fixing.
Rv Rubber Roof Replacement Corona, CA
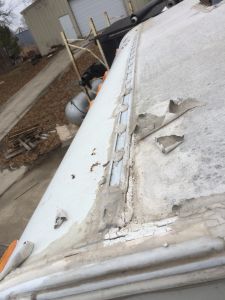
A dripping roofing system is possibly one of the most persistent problem for several Recreational vehicles. Whether it's created by dropping branches, freezing water, or some various other source, it seems that water constantly finds its way right into RVs. Water and RVs were not implied to live with each other, and also a tiny leak can lead to dreadful effects in your Motor home.
It's all too usual to really feel the drip of a leaky roofing in your Recreational vehicle. Openings and leaks can happen when heat from the sunlight creates the roof product to warp or soften.
Repair Rv Roof Leak Corona, CA
No matter how the leakage occurs, once water enters your trailer, the troubles will truly start. Even percentages of water can offer the best environment for mold and mold to grow. If your recreational vehicle isn't well-ventilated, the mildew will promptly spread and take over. This is why lots of older campers have a characteristic moldy smell.
Roof coverings in certain have a lot of possible leak locations. A roof joint and the location around a screw might require different roofing sealers.
It enables whatever to flex so is much less most likely to fracture. Some home windows aren't entirely secured, however it's still crucial to keep the seals that are called for. The very best means to is to frequently check the integrity of your seals. Stroll around your entire RV and inspect every area of transition or penetration.
Make it a concern to recognize where you have RV sealers and what locations are at danger for cracks and various other damage. Being acquainted with the area of every one of your sealants makes your sealant check both fast and effective. Doing that detailed check (it can take as low as 15 mins) twice a year can save you from the aggravation and expenditure of a major water damage repair service.
Rv Trailer Rubber Roof Repair Corona, CA
A dripping roofing system is potentially one of the most relentless problem for lots of Recreational vehicles. Whether it's caused by falling branches, freezing water, or some various other source, it seems that water constantly locates its method right into RVs. Water and RVs were not indicated to live together, and also a little leak can lead to devastating effects in your Recreational vehicle.
It's all also usual to really feel the drip of a leaking roofing system in your RV. There are several causes for a dripping roof covering. Water can make it through also the smallest spaces, and if it takes place to ice up hereafter, the water will certainly broaden and make the trouble also worse. Openings and leaks can take place when warmth from the sun creates the roofing system product to warp or soften.
No matter how the leak takes place, when water enters your trailer, the troubles will actually start. Even small amounts of water can give the perfect habitat for mold and mildew to prosper. If your motor home isn't well-ventilated, the mold will rapidly spread out and take control of. This is why many older campers have a characteristic mildewy odor.
Rv Rubber Roof Replacement Cost Corona, CARv Roof Leak Repair Near Me Corona, CA
Rubber Roof Installation Corona, CA
Rubber Roofing For Rv Corona, CA
Rv Roof Leak Repair Corona, CA
Rv Slide Out Roof Repair Corona, CA
Rv Roof Repair Corona, CA
Resealing Rv Roof Corona, CA
Rv Fiberglass Roof Repair Corona, CA
Rv Trailer Rubber Roof Repair Corona, CA
Replace Rv Roof Corona, CA
Rv Roof Leak Repair Near Me Corona, CA
Rv Slide Out Roof Repair Corona, CA
Rv Slide Out Roof Repair Corona, CA
Rv Roof Repair Corona, CA
Rv Roof Repair Near Me Corona, CA
Rv Roof Leak Repair Near Me Corona, CA
Rv Trailer Rubber Roof Repair Corona, CA
Rv Roof Leak Repair Corona, CA
Repair Rv Roof Leak Corona, CA
Rv Roof Repair Service Near Me Corona, CA
Rubber Roofing For Campers Corona, CA
Rv Rubber Roof Maintenance Corona, CA
Rubber Roofing For Rv Corona, CA
Rv Roof Leak Repair Near Me Corona, CA
Rubber Roof For Rv Corona, CA
Rv Trailer Rubber Roof Repair Corona, CA
Rv Roof Repair Corona, CA
Epdm Rv Roof Repair Corona, CA
Rubber Roof For Rv Corona, CA
Rv Roof Replacement Corona, CA
Rv Roof Replacement Corona, CA
Rubber Roofing For Rv Corona, CA
Rv Roof Replacement Corona, CA
Rubber Roofing For Campers Corona, CA
Rv Roof Repair Near Me Corona, CA
Rv Roof Replacement Corona, CA
Rv Roof Leak Repair Corona, CA
Rv Roof Repair Corona, CA
Best Rv Roof Repair Corona, CA
Rv Roof Repair Near Me Corona, CA
Rv Rubber Roof Replacement Cost Corona, CA
Repair Rv Roof Corona, CA
Rv Roof Maintenance Corona, CA
Repair Rv Roof Leak Corona, CA
Rv Roof Repair Fiberglass Corona, CA
Replace Rv Roof Corona, CA
Replace Rv Roof Corona, CA
Rubber Roofing For Campers Corona, CA
Class C Rv Roof Repair Corona, CA
Rv Roof Repair Fiberglass Corona, CA
Rv Roof Replacement Corona, CA
Rv Fiberglass Roof Repair Corona, CA
Rv Rubber Roof Repair Corona, CA
Rubber Roof Installation Corona, CA
Repair Rv Roof Leak Corona, CA
Motorhome Roof Replacement Corona, CA
Rubber Roof Installation Corona, CA
Rv Roof Repair Service Near Me Corona, CA
Rv Rubber Roof Repair Corona, CA
Class C Rv Roof Repair Corona, CA
Roof Repair For Rv Corona, CA
Rv Roof Leak Repair Corona, CA
Rv Roof Repair Near Me Corona, CA
Rubber Roof For Camper Corona, CA
Rv Rubber Roof Repair Corona, CA
Rv Roof Leak Repair Near Me Corona, CA
Rubber Roof For Camper Corona, CA
Rubber Roof Installation Corona, CA
Replace Rv Roof Corona, CA
Resealing Rv Roof Corona, CA
Rv Roof Leak Repair Near Me Corona, CA
Rv Roof Leak Repair Near Me Corona, CA
Rv Roof Repair Fiberglass Corona, CA
Rv Roof Repair Near Me Corona, CA
Rv Slide Out Roof Repair Corona, CA
Rv Roof Repair Service Near Me Corona, CA
Replace Rv Roof Corona, CA
Affordable Seo Marketing Agency Corona, CA
Local Seo Marketing Agency Corona, CA
Rv Slide Out Roof Repair [:city], [:state]
OCRV Center
Table of Contents
- – Rv Roof Repair Near Me Corona, CA
- – OCRV Center
- – Best Rv Roof Repair Corona, CA
- – Rv Roof Leak Repair Near Me Corona, CA
- – Resealing Rv Roof Corona, CA
- – Rv Roof Repair Fiberglass Corona, CA
- – Motorhome Roof Replacement Corona, CA
- – Rv Roof Repair Fiberglass Corona, CA
- – Rv Roof Maintenance Corona, CA
- – Rv Slide Out Roof Repair Corona, CA
- – Rv Roof Repair Corona, CA
- – Rv Rubber Roof Replacement Corona, CA
- – Repair Rv Roof Leak Corona, CA
- – Rv Trailer Rubber Roof Repair Corona, CA
- – OCRV Center
Latest Posts
Tustin Rv Repair Shops Near My Location
Repair Swamp Cooler Pan Tujunga
Evaporative Cooler Replacement Montrose
More
Latest Posts
Tustin Rv Repair Shops Near My Location
Repair Swamp Cooler Pan Tujunga
Evaporative Cooler Replacement Montrose