All Categories
Featured
Table of Contents
- – Rv Camper Ac Repair Norco, CA
- – OCRV Center
- – Pop Up Camper Repair Norco, CA
- – Camper Service Near Me Norco, CA
- – Camper Roof Replacement Norco, CA
- – Pop Up Camper Canvas Repair Norco, CA
- – Camper Repair And Service Norco, CA
- – Pop Up Camper Roof Repair Norco, CA
- – Camper Repair Shop Near Me Norco, CA
- – Camper Trailer Repair Norco, CA
- – Pop Up Camper Canvas Repair Norco, CA
- – Camper Trailer Service Near Me Norco, CA
- – Camper Roof Repair Near Me Norco, CA
- – Camper Service Center Norco, CA
- – Camper Repair Shop Norco, CA
- – OCRV Center
Rv Camper Ac Repair Norco, CA
Thankfully, we didn't need to change the interior 1 x 2 structure, and therefore we could maintain the skin and foam connected. To eliminate the 1 x 2 items that were still connected, I used a tiny, 4-1/2 small round saw to reduce from the lower right along the edge of the 1 x 2.
I rebuilt this frame when the roofing system was detached from the camper, resting on the sawhorses. To create a specific size suit of the side panels, you can make use of the old sides as a theme. If your old sides are so water harmed that they break down into tiny pieces (like mine did), after that use the old aluminum skin that was connected to the old wood as your template.
Rather, we made a decision to use 1 boards (which are actually 3/4 thick) - Camper Trailer Repair Near Me Norco. To compensate for the distinction in thickness, we simply used a router to scratch away 1/4 from the ends where the boards would fulfill.
Pop Up Camper Repair Norco, CA
Connect the sides boards to the lift arms. After the back and front of the roofing system framework was developed, it was time to affix the ceiling (with the leading light weight aluminum skin still connected) to the camper.
I dipped each screw in Dicor Lap Sealer as a way to protect versus water sneaking in the in the future. You can see where we screwed the roofing to the sides in the video listed below. I used contact concrete to connect the aluminum roof skin to the back and front timber boards.
Camper Service Near Me Norco, CA
I'm servicing a full article on just how to eliminate silicone caulk from a motor home and just how to get rid of old butyl tape deposit. I'll link that here as quickly as it's ended up. The item I made a decision to make use of to make certain none of those joints took anymore water was Eternabond Tape.
Basically, it's a rubberized tape that bends with modifications in temperature and conditions. It's uber sticky, and creates a water-proof seal. Update: I've been making use of Eternabond tape for 7 years on various campers and it is my go-to item for exterior motor home repair services. I have a complete blog post on this post in the works! I started with the side seams of my camper and applied one long term of the tape throughout each seam.
There are a few tricks to using this tape, and you have to beware concerning overlapping items, because in some cases water can still slip in. You can see even more information on utilizing this tape in the video clip listed below. After the roofing system is connected back to the training brackets, you can affix the canvas back to the roof.
Since we determined to only change the 1 x 2 exterior frame of the roof covering and recycle the foam and interior paneling, I most definitely required to come up with an option to conceal the component of the roof that had peeled off away as a result of the water damages. Below you'll find the total tutorial on how to make use of glue up ceiling tiles in a motor home to give the interior a totally brand-new look.
Camper Roof Replacement Norco, CA
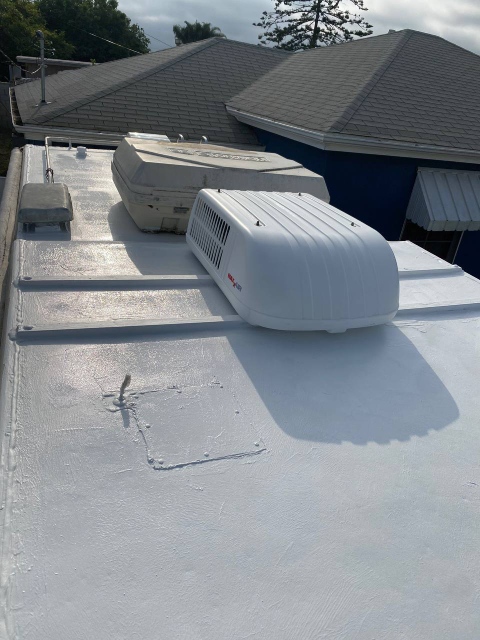
We have not had any type of leaks or water entering the camper yet! We maintain it kept outside (and lie in north Illinois where it rains, snows, and hails), however to be safe we covered it with an item of 4 mil plastic, and after that put a tarp on top of that for the winter.
The trim strips that exist level on top of the camper (at the front and back) are generally covered with a RV lap sealant, much like the screw directly all the roofing system fixtures. On the sides, the rubber roofing twists around the side of the camper and the trim strip is secured to the side of the camper on top of the rubber.
Here's exactly how to get rid of the roofing system trim molding during a recreational vehicle roof covering repair project! Since one of the side trim moldings is also the awning rail (which holds the side of the awning canvas to the camper) I've split this into 2 articles. The 2nd one will certainly reveal you exactly how to get rid of a RV awning.
Pop Up Camper Canvas Repair Norco, CA
As you can see it is absolutely buried in lap sealant, Recreational vehicle roof covering layer, and different caulking jobs from over the years. As common, I begin by reducing away any remaining rubber roof with an energy blade, right up to the side of the trim.
The back discontinuation bar (roof covering trim molding) is totally hidden with lap sealer, caulk, and a recreational vehicle roofing system finishing. I have actually reduced away some of the rubber and scraping up the lap sealant and caulk to expose the screw heads. As soon as you have actually subjected some screw heads and removed some screws you can begin lifting the trim strip.
Camper Repair And Service Norco, CA
Note that the side trim has a vinyl insert as opposed to lap sealer. Getting rid of the last screw from the back discontinuation bar (roofing system trim molding.) Lifting up the molding and peeling the last little bit of rubber from beneath it. Several of the screws will be rusty and hard to turn or simply rotating in their opening.
Often I use pliers. When I got all the screws out and raised up the trim molding, I tried scuffing away some of the RV roof layer that had repainted over it.
Pop Up Camper Roof Repair Norco, CA
Bear in mind, an 8 foot area of level trim molding expenses $15 to $20 and they're difficult to discover online. I despise to throw away able to be used products however it depends on you to determine just how much your time is worth! Attempting to tidy up old RV roofing sealant from the level trim molding is not enjoyable.
The trim strip at the front edge of the rubber roof covering (aka termination bar). This one is also buried in layers of lap sealer, caulk, and roofing finish repair work.
Camper Repair Shop Near Me Norco, CA
That will have to be covered thoroughly later on with a self leveling lap sealant or a sealing tape, or both! Once all the screw heads are exposed and gotten rid of, I peeled up the discontinuation bar and saw just how the layers were stacked underneath.
That's because there is no lap sealant on the screw heads! Rather there is a plastic trim insert that fits inside the trim molding and covers the screw heads.
I cut it with an utility blade and then started pulling out the plastic trim insert from the molding. Beginning to pull up the plastic trim insert from the side roofing system trim molding.
A detail of the side of the camper roof when the trim and rubber have actually been gotten rid of. So currently there is just one piece of roofing system trim molding entrusted to get rid of: the one beyond of the camper. Nonetheless, this is a bit more complex since this trim piece also happens to function as the awning rail which supports the canvas of the awning to the side of the camper.
Camper Trailer Repair Norco, CA
Directly over! Next off up, removing the awning! (See next blog post.).
Learn added information regarding recreational vehicle insurance policy coverages and just how the procedure helps filing a RV insurance claim. If the awning on your motorhome or travel trailer is damaged as a result of your carelessness, it likely won't be covered by a typical RV plan. If your awning degrades due to lasting sunlight direct exposure, that can be taken into consideration wear and tear and may not be covered.
These types of coverage endorsements may not be readily available, especially if you reside in your recreational vehicle full-time. If your motor home's roofing system leakage is the result of extreme weather, you may be covered for RV roof damages if you can confirm the leak arised from the event. A leakage that creates due to your oversight commonly will not be covered.
Pop Up Camper Canvas Repair Norco, CA
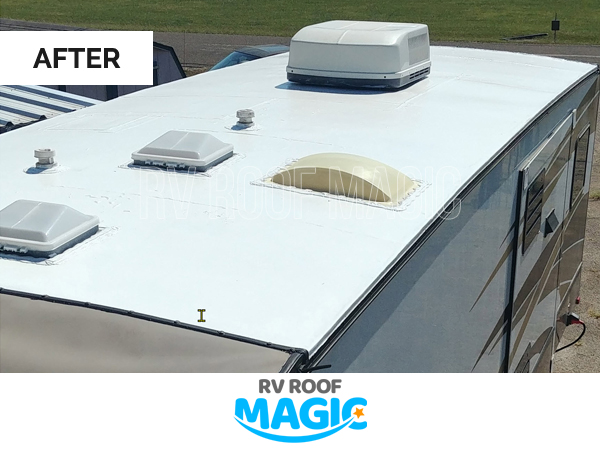
Right here's a detailed guide I mapped out that I want a person had provided me when I began my RV trip. When it comes to RV maintenance and repair services, the roof should always be evaluated very carefully and regularly.
Since your motor home roof covering is clean, you prepare to secure! Prior to obtaining began, it's important to note that when it comes to RV roof covering leakages, there isn't a one dimension fits all solution. Each leakage is distinct and relying on its dimension and location, it might need a certain sort of fix.
RV Roofing System Drip Repair Service: Emergencies Advantages: Can be applied on a wet surface, making it best for a fast fix for smaller leakages during or after a tornado. Pro Suggestion: See to it to utilize enough tape to hide the opening or gap completely, leaving about an inch of tape all the method around the damaged area to obtain the most effective coverage.
Camper Trailer Service Near Me Norco, CA
Motor Home Roofing Drip Fixing: Targeting Particular Locations Advantages: Great for a longer-term remedy. Pro Suggestion: Hold the can at a 45-degree angle and use directly to the trouble location being dealt with.
Pro Tip: Before using this product, you'll desire to make certain the surface is completely dry. Be sure to properly test it on a little area initially before using it on a big surface. Several coats are urged! You should enable 24-48 hours for the item to heal before each coat.
Camper Roof Repair Near Me Norco, CA
While no Recreational vehicle roof lasts permanently, appropriate upkeep is vital for its durability. With routine assessment and the power of The Flex Seal Family of Products, you can aid prolong your RV roof covering's life and keep it going strong as you delight in the fantastic outdoors.
Asen is a full time recreational vehicle traveler since 2018 and is the proprietor of the blog, Camper Life. He likes outdoor camping in nature, angling, and hanging out with his household. Making every effort to provide the most important details about campers and Motor homes, he shares every little thing he learned throughout the years.
Below's a detailed overview I mapped out that I desire somebody had actually offered me when I started my RV journey. When it comes to RV upkeep and fixings, the roof covering should constantly be evaluated carefully and regularly.
Now that your recreational vehicle roofing system is clean, you're ready to seal! However before starting, it is essential to note that when it concerns recreational vehicle roofing system leaks, there isn't a one size fits all service. Each leak is distinct and depending on its size and location, it may require a specific sort of repair.
Camper Service Center Norco, CA
RV Roof Covering Leak Repair Work: Emergencies Conveniences: Can be used on a damp surface area, making it perfect for a fast repair for smaller leakages throughout or after a tornado (Camper Trailer Repair Near Me Norco). Pro Pointer: Ensure to make use of adequate tape to hide the opening or void entirely, leaving concerning an inch of tape completely around the affected area to get the most effective protection
Recreational Vehicle Roof Covering Leak Repair: Targeting Certain Locations Benefits: Great for a longer-term remedy. Frequently made use of around vents and other seams that require resealing. Pro Pointer: Hold the can at a 45-degree angle and apply directly to the trouble area being treated. Flex Shot takes about 24-48 hours to treat and should be applied on a dry surface.
Pro Idea: Before using this item, you'll want to make sure the surface area is completely dry. Be certain to correctly examine it on a little area initially prior to using it on a large surface area.
Camper Repair Shop Norco, CA
Use correct security equipment like gloves and protective eyeglasses as essential. Use painter's tape and cover the areas you desire to prevent finish, specifically hinges and various other moving parts. While no motor home roof covering lasts permanently, appropriate maintenance is necessary for its long life. With routine assessment and the power of The Flex Seal Family Members of Products, you can aid expand your recreational vehicle roofing's life and keep it going strong as you enjoy the terrific outdoors.
Asen is a full-time recreational vehicle vacationer given that 2018 and is the proprietor of the blog site, Camper Life. He likes outdoor camping in nature, angling, and investing time with his household. Making every effort to offer the most valuable details about campers and Recreational vehicles, he shares everything he found out for many years.
Camper Trailer Repair Near Me Norco, CACamper Trailer Repair Near Me Norco, CA
Camper Air Conditioner Repair Near Me Norco, CA
Pop Up Camper Roof Replacement Norco, CA
Camper Awning Replacement Norco, CA
Camper Air Conditioner Repair Near Me Norco, CA
Pop Up Camper Canvas Repair Norco, CA
Rv Camper Repair Norco, CA
Camper Repair Shop Norco, CA
Camper Services Norco, CA
Camper Services Norco, CA
Pop Up Camper Roof Replacement Norco, CA
Camper Roof Replacement Norco, CA
Camper Awning Replacement Norco, CA
Camper Roof Replacement Norco, CA
Camper Repair Shop Near Me Norco, CA
Camper Repair Shop Near Me Norco, CA
Camper Awning Replacement Norco, CA
Pop Up Camper Roof Repair Norco, CA
Camper Repair Norco, CA
Camper Air Conditioner Repair Near Me Norco, CA
Pop Up Camper Repair Near Me Norco, CA
Camper Awning Replacement Norco, CA
Camper Awning Replacement Norco, CA
Pop Up Camper Repair Norco, CA
Camper Trailer Repair Near Me Norco, CA
Camper Repair Shop Near Me Norco, CA
Camper Service Center Norco, CA
Camper Roof Replacement Norco, CA
Rv Camper Ac Repair Norco, CA
Pop Up Camper Roof Replacement Norco, CA
Camper Roof Repair Norco, CA
Camper Repair Norco, CA
Camper Services Norco, CA
Camper Awning Replacement Norco, CA
Pop Up Camper Roof Replacement Norco, CA
Camper Roof Repair Norco, CA
Camper Repair Places Near Me Norco, CA
Pop Up Camper Repair Norco, CA
Pop Up Camper Canvas Repair Norco, CA
Camper Repair Norco, CA
Camper Air Conditioner Repair Near Me Norco, CA
Camper Air Conditioner Repair Near Me Norco, CA
Camper Service Near Me Norco, CA
Camper Roof Repair Norco, CA
Camper Repair Shop Near Me Norco, CA
Camper Repair Shops Near Me Norco, CA
Camper Air Conditioner Repair Near Me Norco, CA
Pop Up Camper Repair Near Me Norco, CA
Camper Repair Shops Near Me Norco, CA
Camper Service Norco, CA
Camper Repair Shop Norco, CA
Camper Repair Places Near Me Norco, CA
Pop Up Camper Repair Near Me Norco, CA
Camper Roof Replacement Norco, CA
Camper Trailer Repair Norco, CA
Camper Roof Replacement Norco, CA
Pop Up Camper Roof Replacement Norco, CA
Camper Repair Shop Norco, CA
Camper Repair Near Me Norco, CA
Camper Services Norco, CA
Pop Up Camper Repair Norco, CA
Camper Service Center Norco, CA
Camper Air Conditioner Repair Near Me Norco, CA
Camper Repair Places Near Me Norco, CA
Camper Trailer Repair Norco, CA
Camper Roof Repair Near Me Norco, CA
Pop Up Camper Repair Norco, CA
Camper Awning Replacement Norco, CA
Camper Trailer Service Near Me Norco, CA
Rv Camper Ac Repair Norco, CA
Camping Repair Near Me Norco, CA
Pop Up Camper Repair Norco, CA
Camper Service Near Me Norco, CA
Camper Roof Repair Near Me Norco, CA
Camper Trailer Repair Near Me Norco, CA
Camper Service Norco, CA
Camper Awning Repair Norco, CA
Finding A Good Local Seo Citations Norco, CA
Close To Seo Management Norco, CA
OCRV Center
Table of Contents
- – Rv Camper Ac Repair Norco, CA
- – OCRV Center
- – Pop Up Camper Repair Norco, CA
- – Camper Service Near Me Norco, CA
- – Camper Roof Replacement Norco, CA
- – Pop Up Camper Canvas Repair Norco, CA
- – Camper Repair And Service Norco, CA
- – Pop Up Camper Roof Repair Norco, CA
- – Camper Repair Shop Near Me Norco, CA
- – Camper Trailer Repair Norco, CA
- – Pop Up Camper Canvas Repair Norco, CA
- – Camper Trailer Service Near Me Norco, CA
- – Camper Roof Repair Near Me Norco, CA
- – Camper Service Center Norco, CA
- – Camper Repair Shop Norco, CA
- – OCRV Center
Latest Posts
Ductwork Cleaning Panorama City
Jurupa Valley Affordable Web Design
Local Seo Agency Fontana
More
Latest Posts
Ductwork Cleaning Panorama City
Jurupa Valley Affordable Web Design
Local Seo Agency Fontana