All Categories
Featured
Table of Contents
- – OCRV Center
- – What Makes Custom RV Paint Jobs Near Me the To...
- – Understanding Full Body Repaint RV vs Partial...
- – Benefits of Comprehensive Exterior Work
- – When Partial Repairs Make Sense
- – How Much Does a Full Body RV Paint Job Cost in...
- – Cost Breakdown by Motorhome Class and Size
- – Class A Motorhomes ($10,000–$20,000+)
- – Class C and Smaller Units ($5,000–$12,000)
- – Factors Influencing Pricing
- – Prep Work and Fiberglass Repairs
- – Custom Designs and Graphics Add-Ons
- – Insurance Claim Handling for Paint Repairs
- – What Is the Step-by-Step Process for Professio...
- – Initial Assessment and Color Matching
- – Advanced Systems for Factory Accuracy
- – Surface Preparation and Priming
- – Addressing Common Damage Types
- – Application and Curing in Controlled Environm...
- – Heated Booth Advantages
- – Final Inspection and Protection Layers
- – Why Choose Experts for Custom RV Paint Jobs Ne...
- – Key Differentiators in Quality and Service
- – Certifications and Affiliations
- – Satisfaction Guarantee Details
- – Real Results from Motorhome Owners
- – Common Concerns About Custom RV Paint Jobs Nea...
- – Concern: Will the Finish Last in Harsh Condit...
- – Solutions with UV Protection and Quality Mat...
- – Concern: How Disruptive Is the Timeline?
- – Efficient Scheduling and Turnaround Expectat...
- – Concern: Matching Original or Custom Colors A...
- – We Can Help! Contact Us Today
- – Frequently Asked Questions About Custom RV Pai...
- – OCRV Center
Many California motorhome owners regularly seek custom RV paint jobs near me as their rig's outside begins displaying effects of ongoing sun, wind, highway grit, and changing climates. Faded gelcoat, chalky surfaces, peeling decals, and mismatched repairs diminish appearance and enjoyment during trips. These conditions frequently arise from long-term sun damage that erodes pigments, resulting in oxidation and reduced shine. Lots of owners detect the change over time, commencing with minor fading that later influences complete exterior presence and driving confidence. Addressing this through professional RV exterior restoration restores not only looks but also protection against further damage.
Leading motorhome repair providers in California highlight complete strategies incorporating professional setup, long-wearing products, and exact techniques to produce lasting finishes. Providers specialize in full body repaint RV solutions that treat complete exteriors for even defense or localized repairs for particular damage. Such approaches emphasize excellence to avoid repeated issues such as blistering, splitting, or color inconsistencies that lower-cost or hurried jobs often produce. Owners gain advantages from methods including UV resistant coatings and protective clear coats, prolonging surface longevity considerably. Skilled execution upholds structural soundness while boosting appearance, resulting in a motorhome that appears renewed and set for travel. Services also handle custom graphics integration, allowing personalization that reflects individual style without compromising functionality. For more on comprehensive RV care, visit the RV repair overview.
What Makes Custom RV Paint Jobs Near Me the Top Choice for Motorhome Restoration?
Custom RV paint jobs near me stand out as a leading solution for motorhome owners seeking reliable RV exterior restoration because they address both cosmetic and protective needs through skilled techniques and premium materials. Processes start with thorough inspections to detect hidden problems such as oxidation or fiberglass weakness, guaranteeing a solid base for perfect outcomes. Such methods avoid subsequent problems that budget options commonly miss. Owners feel reassured understanding the treatment endures California's harsh surroundings, ranging from seaside salt exposure to desert temperatures. Data reveals expert repaints often add years to finish lifespan and increase resale desirability.
Understanding Full Body Repaint RV vs Partial Touch-Ups
A full body repaint RV entails total exterior treatment, proving necessary for widespread fading, numerous scratches/chips, or prior repairs displaying clear lines and shade differences. The method removes existing coatings completely, applies high-adhesion primers, and builds multiple base and clear coats for uniform depth and resilience.
Partial touch-ups concentrate on isolated damage, blending new material into surrounding areas to minimize visibility of the repair zone. They suit minor concerns such as stone impacts or confined fading, providing quicker completion and reduced total cost while preserving general condition.
Full repaints create seamless color transitions and complete protective coverage, lowering the chance of future edge lifting or mismatched aging. Partial repairs maintain cost efficiency for owners whose damage remains limited, offering a practical middle ground that still improves appearance and durability significantly.
Benefits of Comprehensive Exterior Work
Comprehensive treatments deliver even color application across all panels, eliminating weak spots that partial fixes sometimes leave behind. They incorporate thorough UV resistant coatings, offering superior shielding against sun-induced harm. Owners frequently report considerable improvements in visual presence and assurance once their motorhome appears renewed and maintained.
When Partial Repairs Make Sense
Targeted repairs suit owners dealing with contained damage that remains limited to specific areas. They allow targeted correction without the time and expense of full disassembly. When performed by skilled technicians, these fixes blend invisibly and extend the life of existing finishes effectively.
The combination of these options allows motorhome owners to achieve standout results tailored to their specific situation. Reach out for a complimentary consultation to identify the best restoration approach. Explore related body and collision work through the RV collision repair services.
How Much Does a Full Body RV Paint Job Cost in California?
Understanding full body RV paint job cost in California helps owners budget realistically for custom RV paint jobs near me without unexpected surprises. Costs vary based on motorhome size, damage extent, material quality chosen, and extra features like graphics or special finishes. Transparent breakdowns enable informed choices that balance upfront costs with long-term resilience and resale benefits. Regional averages reflect higher labor and material standards in California compared to other areas.
Cost Breakdown by Motorhome Class and Size
Class A motorhomes, given their substantial exterior area, typically cost $10,000 to $20,000 or more for full-scope work covering total stripping, priming, layered painting, and final sealing. Class C models and compact trailers often range $5,000 to $12,000 based on project extent. Sectional or partial treatments frequently begin at $2,000 to $6,000 when addressing specific sections. These ranges cover superior automotive paints and professional application in controlled conditions that deliver reliable quality and investment value.
Class A Motorhomes ($10,000–$20,000+)
The expansive size of Class A models necessitates increased materials and additional application duration. Thorough application validates the increased expense via better defense and marked resale value boost for luxury models.
Class C and Smaller Units ($5,000–$12,000)
Compact units enjoy adjusted pricing that maintains the same quality levels for prep and completion. This method provides outstanding worth through similar durability and visual improvements.
Factors Influencing Pricing
Detailed preparation, including fiberglass correction for cracks, delamination, or structural issues, adds to the price when foundational damage must be addressed beforehand. Personalized designs and graphics add to the cost through specialized effort required for accurate pattern development and placement. The choice of high-performance UV resistant coatings and multi-layer clear systems adds to the cost but provides superior fade resistance and gloss retention. Complexity of color changes or matching rare factory shades can also influence the final figure modestly.
Prep Work and Fiberglass Repairs
Thorough prep corrects concealed issues including moisture damage or collision stress areas. This foundational step prevents future separation or cracking that could compromise the new finish.
Custom Designs and Graphics Add-Ons
Tailored additions need meticulous design and precise execution to blend perfectly (Norco Painting Fiberglass Motorhome). These features generate standout styles that mirror individual choices and improve total appearance
Insurance Claim Handling for Paint Repairs
Numerous insurance policies cover exterior damage resulting from accidents, hail storms, or severe weather under comprehensive coverage provisions. Knowledgeable shops coordinate claims effectively, preparing complete documentation, photos, and estimates to aid adjuster assessments. This assistance commonly decreases personal financial burden significantly. Initial policy check reveals included items and speeds up approval schedules.
Open pricing along with skilled assistance eases budgeting. Contact us for a complimentary detailed estimate customized to your motorhome. Explore collision-related services through the RV collision repair guide.
What Is the Step-by-Step Process for Professional RV Painting?
Skilled RV painting uses a structured, step-by-step approach intended to create resilient, attractive surfaces that resist continuous wear and environmental stress. Each stage progresses from the prior, correcting vulnerabilities early and securing results that fulfill or exceed requirements. This systematic method distinguishes quality work from rushed alternatives that may fail prematurely.

Initial Assessment and Color Matching
Experts conduct thorough examinations to assess damage scope and select appropriate materials and methods. Advanced systems achieve factory color match RV precision through digital scanning and color formulation tools that replicate original shades accurately. This prevents visible differences and maintains authenticity. Detailed reports outline scope, potential challenges, and recommended approaches, giving owners full visibility into the project ahead.
Advanced Systems for Factory Accuracy
Spectrophotometers gather paint data for accurate matching regardless of manufacturer. This system avoids trial-and-error and creates matches that merge flawlessly with remaining factory paint.
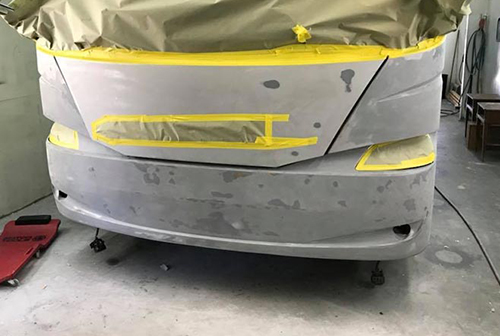
Surface Preparation and Priming
All surfaces receive mechanical sanding, chemical cleaning, and high-adhesion priming to establish optimal bonding conditions. This stage corrects oxidation, removes contaminants, and fills minor imperfections to create a smooth, stable base. Effective preparation prevents usual issues including bubbling, peeling, or inconsistent texture in the final coat. Sequential grit applications ensure the surface satisfies strict criteria before proceeding.
Addressing Common Damage Types
Oxidation removal restores the substrate to a sound condition. Fiberglass work seals openings and bolsters vulnerable spots. Thorough preparation promotes bonding and stops repeated problems.
Application and Curing in Controlled Environments
Base layers apply in heated downdraft booths regulating temperature, humidity, and particles for consistent coverage and quicker curing. Norco Painting Fiberglass Motorhome. Several layers with managed flash intervals create thickness and richness without sagging or texture defects. Controlled conditions produce consistent hardness and gloss across all panels. This setup substantially lowers defects compared to open-air methods
Heated Booth Advantages
Booths exclude dust and impurities while supporting consistent curing. This produces tougher, more durable coatings with exceptional endurance and looks.
Final Inspection and Protection Layers
Technicians conduct multiple inspections at every stage to verify uniformity, color consistency, and defect absence before applying UV resistant coatings and final clear layers. Polishing and compounding achieve showroom-level gloss. These concluding steps lock in protection and enhance depth for a professional appearance that endures.
This thorough method produces reliable, superior results. Contact us for a complimentary process overview. View related fiberglass work on the RV fiberglass repair page.
Why Choose Experts for Custom RV Paint Jobs Near Me in Southern California?
Experts in custom RV paint jobs near me in Southern California stand apart via recognized certifications, polished methods, and steadfast dedication to owner satisfaction. These characteristics assure services delivered to superior standards that continually satisfy or exceed requirements.
Key Differentiators in Quality and Service
Certifications verify technician proficiency in advanced paint application, safety protocols, and repair standards. Satisfaction guarantees provide assurance that workmanship issues will be resolved promptly. Links to superior suppliers secure availability of best materials and regular training.
Certifications and Affiliations
Industry certifications show continued dedication to excellence standards. Connections to major suppliers enable access to cutting-edge products and development programs.
Satisfaction Guarantee Details
Guarantees handle flaws or dissatisfaction, offering corrections, changes, or resolutions. This policy reinforces owner trust in the quality delivered.
Real Results from Motorhome Owners
A Class A owner in Orange County reported, "The results went beyond expectations and significantly enhanced resale confidence". A camper owner from Fullerton shared, "Professional management made the insurance experience smooth and stress-free end to end". Another Irvine owner commented, "The custom graphics made my older motorhome look completely renewed".
Consistent positive outcomes build lasting confidence. Contact us for a complimentary assessment. Read more owner experiences on the testimonials page.
Common Concerns About Custom RV Paint Jobs Near Me and How Experts Solve Them
Numerous owners thinking about custom RV paint jobs near me voice legitimate worries about finish longevity, schedule disruption, color accuracy, and total worth. Professional services tackle these via clear methods, cutting-edge tools, and reliable systems that focus on enduring satisfaction.
Concern: Will the Finish Last in Harsh Conditions?
UV resistant coatings combined with high-quality base materials effectively resist fading, chalking, and oxidation caused by prolonged sun exposure. Multi-coat systems resist salty air, road grit, and temperature variations prevalent in California. Owners usually experience very little deterioration even following years of intensive use.
Solutions with UV Protection and Quality Materials
Specialized blockers reflect damaging rays as flexible clear coats manage expansion and contraction. Marine-grade formulations add extra resilience against moisture and contaminants.
Concern: How Disruptive Is the Timeline?
Organized planning limits most work to 2–6 weeks based on project size. Regular updates maintain owner awareness and enable scheduling around trips or storage requirements. Efficient workflows avoid unnecessary delays while upholding quality standards.
Efficient Scheduling and Turnaround Expectations
Phased planning prioritizes critical stages without rushing. Online tracking delivers current status updates. This method respects owner timelines and reduces anxiety.
Concern: Matching Original or Custom Colors Accurately?
Precision color-matching technology captures and replicates existing shades with high fidelity, even on aged or weathered surfaces. Sophisticated mixing technology ensures smooth blending with existing original areas. This accuracy preserves authentic appearance or realizes desired custom visions reliably.
Addressing these concerns directly builds assurance. Contact us for a complimentary discussion on your situation. For roof-related issues, check RV roof repair services.
We Can Help! Contact Us Today
Owners set to move forward with custom RV paint jobs near me realize choosing the right service changes hesitation into secure satisfaction. Clear methods and firm guarantees clear hurdles while delivering outcomes that go beyond anticipated results.
For motorhome owners seeking reliable solutions, OCRV Center delivers repeatable, high-return results through expert custom RV paint jobs near me and exterior restoration. Based at 23281 La Palma Ave. Yorba Linda CA 92887, reach (714) 909-1444 for your consultation. Pride reappears as the rig appears striking and feels revitalized on every outing – that emotional uplift from renewed appearance improves journey enjoyment. Logically, it protects investment by stopping further wear, increasing resale worth considerably, and delivering long-lasting defense that validates the expense. With combined team experience over 30 years, certifications, and satisfaction guarantee, results demonstrate reliability and value. Whether for full-time living, family adventures, or weekend escapes, quality restoration fulfills needs dependably. Take the step toward a confident, road-ready motorhome. Additional information is available on the main site, contact page, and RV paint shop page.
Frequently Asked Questions About Custom RV Paint Jobs Near Me
How long does a custom RV paint job take?
Timelines depend on project scope and complexity. Partial touch-ups often finish in 1–2 weeks, while full body repaints typically span 2–6 weeks to accommodate proper curing and detailing stages. Factors include booth availability, custom additions, and environmental conditions. Efficient shops prioritize clear communication and structured planning to minimize inconvenience. Owners value knowing realistic timelines upfront for better planning. See more on the RV paint shop process. (110 words)
Does insurance cover RV exterior restoration?
Coverage depends on the specific policy, but many comprehensive plans include damage from accidents, hail, or severe weather. Experienced shops assist with claims by preparing documentation, photographs, and estimates for adjuster review. This coordination frequently reduces out-of-pocket costs. Early policy review clarifies what qualifies. Professional support simplifies the entire procedure. Learn about related claims on RV collision repair. (105 words)
What is the best paint for RV exteriors in California?
Automotive-grade paints featuring built-in UV resistant coatings (Norco Painting Fiberglass Motorhome) offer superior performance against California's strong sunlight. Multi-layer applications with clear coats deliver excellent gloss, adhesion, and resistance to cracking or peeling. These outperform standard alternatives in fade prevention and longevity. Factory-spec matching maintains consistent appearance. Explore paint options on RV paint shop services. (100 words)
Can custom graphics be added during restoration?
Custom graphics integrate during the painting process, allowing stripes, logos, or airbrush artwork that personalizes the motorhome. Application methods prevent bubbling, peeling, or fading. Designs accommodate different styles while preserving aerodynamics. This addition creates distinctive visual appeal. See graphic examples on photos gallery. (85 words)
How do I get started with local custom RV paint jobs near me experts?
Begin with an initial assessment to evaluate damage and discuss objectives. Submit photos or details for preliminary recommendations. Experts explain available options, timelines, and estimates. This step provides clarity without obligation. Start your process on contact page. (75 words)
What causes RV paint to fade?
Extended UV exposure degrades pigments, resulting in chalking and color loss. Oxidation from environmental elements speeds deterioration. Road debris and improper cleaning accelerate wear. Protective measures reduce these effects. Learn prevention tips on RV maintenance page. (70 words)
Is full body repaint worth it over partial fixes?
Extensive fading or widespread damage benefits from full repaints that provide uniform, long-lasting results. Partial fixes address isolated issues but may show transitions later. Comprehensive work maximizes overall value and appearance. Compare options on RV body shop. (80 words)
How does prep work affect the final finish?
Thorough sanding, cleaning, and priming establish smooth adhesion surfaces. Insufficient preparation causes peeling or uneven texture. Quality prep guarantees even coverage and extended durability. Details on RV paint shop. (70 words)
What maintenance follows a new paint job?
Gentle washing removes contaminants and preserves shine. Waxing or sealants provide additional barriers. Avoid harsh chemicals. Regular care prolongs finish life significantly. See maintenance advice on RV maintenance. (70 words)
Can older motorhomes get modern custom looks?
Modern updates allow contemporary patterns or refreshed schemes on vintage models. Advanced materials improve durability alongside aesthetics. This revitalizes appearance effectively. Explore remodel ideas on RV remodel services. (70 words)
OCRV Center
Address: 23281 La Palma Ave Yorba Linda, CA 92887Phone: (714) 909-1444
Email: [email protected]
OCRV Center
Painting Rv Exterior Norco, CA
Rv Exterior Paint Norco, CA
Painting Rv Walls Norco, CA
Motorhome Painting Near Me Norco, CA
Rv Paint Shops Near Me Norco, CA
Rv Paint Job Norco, CA
Rv Paint Shops Near Me Norco, CA
Class A Rv Custom Paint And Repair Norco, CA
Painting An Rv Norco, CA
Rv Paint Repair Norco, CA
Rv Painting Near Me Norco, CA
Custom Painted Motorhomes Norco, CA
Painting An Rv Norco, CA
Rv Exterior Paint Norco, CA
Rv Painting Norco, CA
Rv Painting Norco, CA
Motorhome Painting Near Me Norco, CA
Paint Motorhome Exterior Norco, CA
Motorhome Paint Repair Norco, CA
Motorhome Painting Near Me Norco, CA
Motorhome Paint Repair Norco, CA
Motorhome Paint Repair Norco, CA
Rv Painting Norco, CA
Motorhome Custom Paint Norco, CA
Painting Rv Exterior Norco, CA
Motorhome Painting Near Me Norco, CA
Motorhome Paint Repair Norco, CA
Motorhome Painting Near Me Norco, CA
Painting Rv Exterior Norco, CA
Motorhome Painting Norco, CA
Motorhome Custom Paint Norco, CA
Rv Paint Shop Near Me Norco, CA
Motorhome Custom Paint Norco, CA
Painting Rv Walls Norco, CA
Rv Paint And Body Shops Near Me Norco, CA
Rv Painting Norco, CA
Rv Paint Repair Norco, CA
Rv Paint And Repair Norco, CA
Motorhome Custom Paint Norco, CA
Rv Painter Norco, CA
Paint Motorhome Exterior Norco, CA
Motorhome Paint Shops Norco, CA
Motorhome Custom Paint Jobs Norco, CA
Motorhome Painting Near Me Norco, CA
Rv Paint Shop Near Me Norco, CA
Paint Motorhome Exterior Norco, CA
Rv Painting Near Me Norco, CA
Custom Painted Motorhomes Norco, CA
Rv Painting Norco, CA
Custom Painted Motorhomes Norco, CA
Motorhome Custom Paint Jobs Norco, CA
Painting Rv Walls Norco, CA
Painting Rv Norco, CA
Rv Paint And Body Shops Near Me Norco, CA
Rv Painting Near Me Norco, CA
Painting Fiberglass Motorhome Norco, CA
Custom Rv Paint Jobs Norco, CA
Custom Rv Paint Norco, CA
Custom Painted Motorhomes Norco, CA
Motorhome Custom Paint Norco, CA
Custom Painted Motorhomes Norco, CA
Paint Rv Norco, CA
Paint Motorhome Exterior Norco, CA
Rv Painting Norco, CA
Motorhome Paint Repair Norco, CA
Motorhome Painting Near Me Norco, CA
Rv Paint Job Norco, CA
Rv Painter Norco, CA
Rv Paint Shops Near Me Norco, CA
Motorhome Paint Repair Norco, CA
Motorhome Paint Shops Norco, CA
Painting Rv Walls Norco, CA
Custom Painted Motorhomes Norco, CA
Rv Paint Repair Norco, CA
Rv Paint And Body Shops Near Me Norco, CA
Motorhome Paint Repair Norco, CA
Paint Fiberglass Rv Norco, CA
Rv Paint Shop Near Me Norco, CA
Around Me Seo Agencies Norco, CA
Near Here Seo Marketing Agency Norco, CA
OCRV Center
Rv Painter Norco, CA
Motorhome Custom Paint Norco, CA
Table of Contents
- – OCRV Center
- – What Makes Custom RV Paint Jobs Near Me the To...
- – Understanding Full Body Repaint RV vs Partial...
- – Benefits of Comprehensive Exterior Work
- – When Partial Repairs Make Sense
- – How Much Does a Full Body RV Paint Job Cost in...
- – Cost Breakdown by Motorhome Class and Size
- – Class A Motorhomes ($10,000–$20,000+)
- – Class C and Smaller Units ($5,000–$12,000)
- – Factors Influencing Pricing
- – Prep Work and Fiberglass Repairs
- – Custom Designs and Graphics Add-Ons
- – Insurance Claim Handling for Paint Repairs
- – What Is the Step-by-Step Process for Professio...
- – Initial Assessment and Color Matching
- – Advanced Systems for Factory Accuracy
- – Surface Preparation and Priming
- – Addressing Common Damage Types
- – Application and Curing in Controlled Environm...
- – Heated Booth Advantages
- – Final Inspection and Protection Layers
- – Why Choose Experts for Custom RV Paint Jobs Ne...
- – Key Differentiators in Quality and Service
- – Certifications and Affiliations
- – Satisfaction Guarantee Details
- – Real Results from Motorhome Owners
- – Common Concerns About Custom RV Paint Jobs Nea...
- – Concern: Will the Finish Last in Harsh Condit...
- – Solutions with UV Protection and Quality Mat...
- – Concern: How Disruptive Is the Timeline?
- – Efficient Scheduling and Turnaround Expectat...
- – Concern: Matching Original or Custom Colors A...
- – We Can Help! Contact Us Today
- – Frequently Asked Questions About Custom RV Pai...
- – OCRV Center
Latest Posts
Orange County Truck Service
Chino Hills Rv Repair And Service Near Me
Rv Mechanic Brea
More
Latest Posts
Orange County Truck Service
Chino Hills Rv Repair And Service Near Me
Rv Mechanic Brea