All Categories
Featured
Table of Contents
- – Rv Replacement Awnings Norco, CA
- – OCRV Center
- – Rv Dinette Booth Norco, CA
- – Rv Dinette Table Norco, CA
- – Rv Upholstery Norco, CA
- – Rv Dinette Booth Norco, CA
- – Replacement Rv Refrigerator Norco, CA
- – Awning Installation Norco, CA
- – Rv Interior Furniture Norco, CA
- – Rv Sofa Sleeper Norco, CA
- – Replace Rv Flooring Norco, CA
- – Rv Couch Bed Norco, CA
- – Rv Dinette Booth Norco, CA
- – Rv Sofa Beds Norco, CA
- – OCRV Center
Rv Replacement Awnings Norco, CA
The last item certainly always pertains to the costs of the services or products. A small cost is not necessarily great for you can shed the low-price advantage in your experience of the product or service. High rate is neither welcome, until the product and services is tested. Materials you will need for setup: Determining tape, security knife (retractable floor covering blade), medium-knap roller, paint stick with roller head (3" to 9"), paint tray, paint tray liner, RecPro RP-128 Recreational Vehicle and Marine Flooring Adhesive, and steel floor covering roller.
Make certain after you search the surface that you clean up all particle issue off of the floor for ideal attachment. Measure your area two times. Ensures the numbers are appropriate before you reduce your floor covering to your precise requirements. The floor covering you get ought to have "slop" to ensure that you have extra to bring down to size.
Rv Dinette Booth Norco, CA
You then utilize the roller with the medium-knap cover and spread it all over the flooring, equally. While this approach is quicker, control of the quantity of adhesive can differ and might trigger the customer not to have enough material for the whole job. Make sure the location is well-ventilated when using.
This approach is chosen because the individual can manage the amount of adhesive used and avoid managing the pail and roller numerous times. Make certain the area is well-ventilated when applying. 6. Permit the glue to cure momentarily on the substrate (to permeate the surface area of the plywood) for best bond.
When healed (once more, for a really brief time), apply your coin or ruby floor covering to the substratum. Lay the floor covering out meticulously and uniformly. Once used, make use of the steel roller to force the floor covering down and get rid of any kind of air pockets and wrinkles. Let sit for 24 humans resources. before using. This item is dispersed under RecPro, the largest manufacturer of watercrafts and mobile homes (RVs).
Rv Dinette Table Norco, CA
The business gets direct from the distributors and storage facilities these in volume for them to be able to provide the finest costs with rapid shipment. When you order with them, delivering will certainly be done within 24-hour.
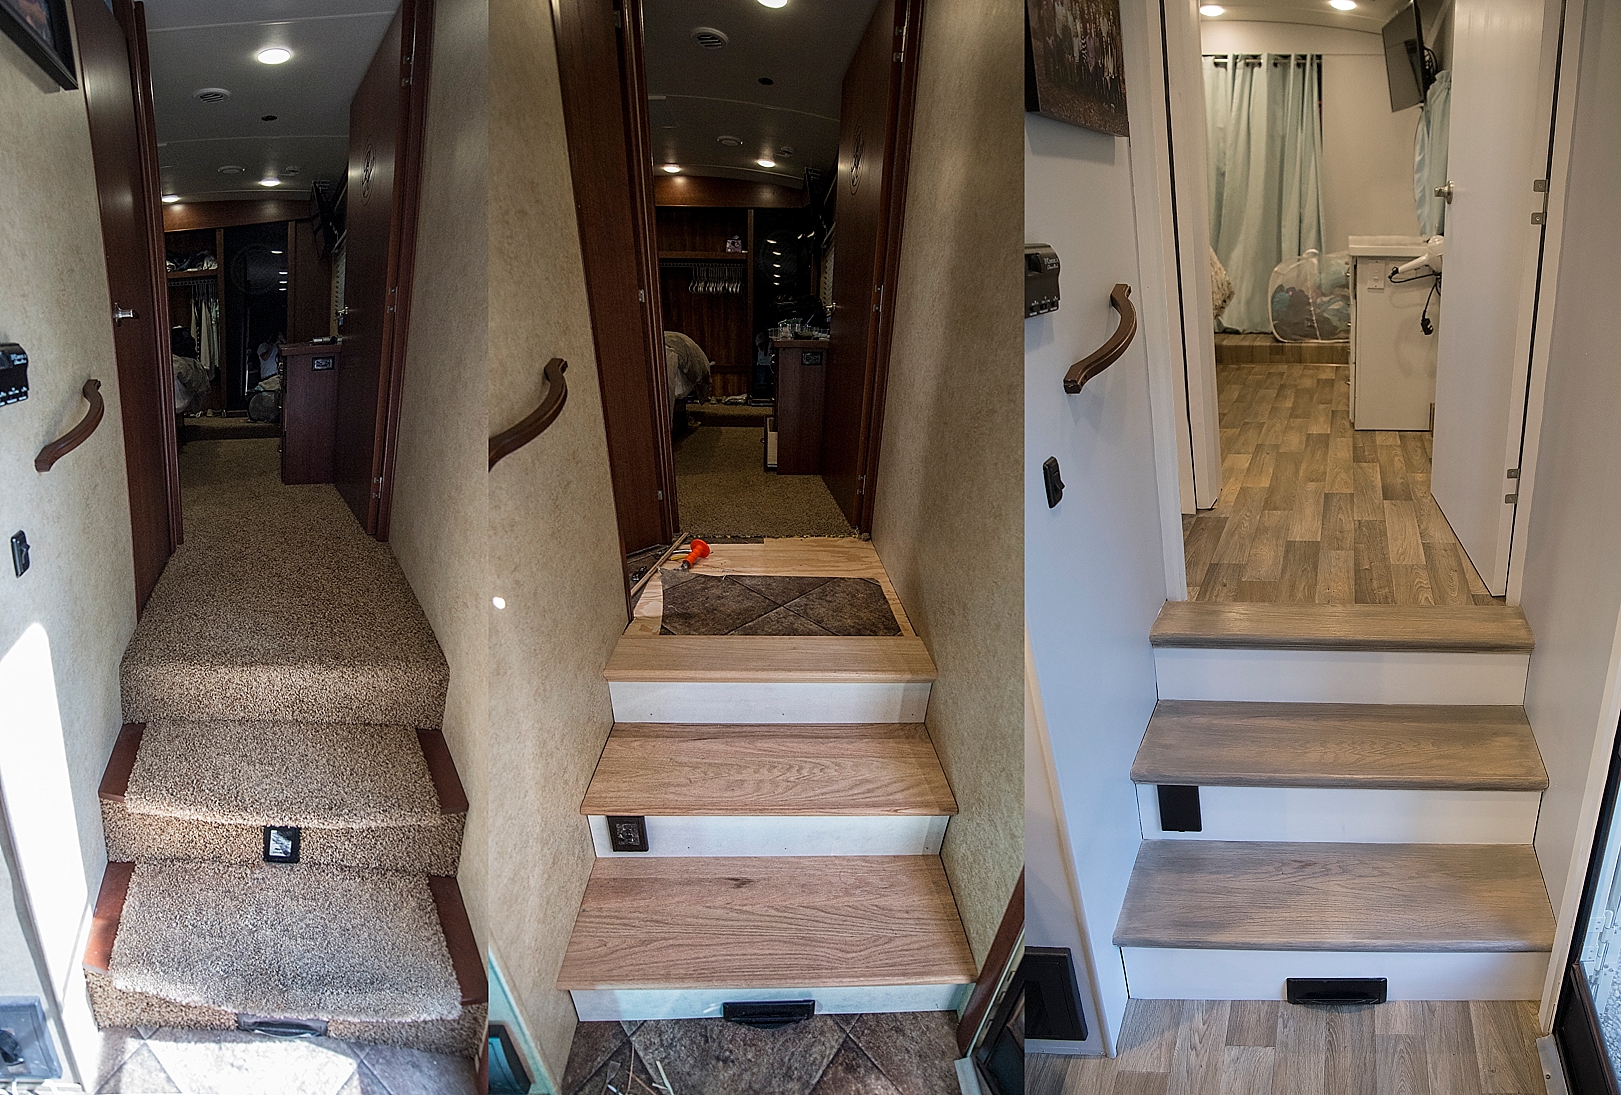
Your RV, motorhome, camper or trailer has actually been your relied on friend on plenty of adventures, but it likewise carries the marks of its journeys. These may be in the form of water damage, rot, or general damage on the recreational vehicle flooring. Examining the degree of this damages is the very first step toward your destination of a perfectly renovated lorry.
Rv Upholstery Norco, CA
The existence of mold and mildew or mildew is another warning sign of water damage. Take the time to inspect your current arrangement to, for example, know if you need to replace rotted timber flooring.
Remember that you shouldn't use underlayment with any of these options as you can simply utilize a floating flooring or adhere straight to the plywood. Laminate floor covering is like the all-terrain lorry of the floor covering worldit's versatile, affordable, and simple to mount. It's a prominent choice amongst RV proprietors thanks to its light-weight nature and the truth that it mimics the look of wood floor covering.
If you're considering this alternative, you'll require to safeguard it from water damages, particularly if you have animals or kids. If you're seeking a flooring option that's long lasting, waterproof, and very easy to tidy, plastic slab floor covering may be your best choice. This is a well-rounded, functional alternative because it withstands the elements and is built to last
Rv Dinette Booth Norco, CA
With your tools, products and plan in place, it's time to roll up your sleeves and study the meat of this project: removing the old RV floor covering. This procedure can vary depending upon the sort of flooring you're taking care of. Vinyl floor covering, carpeting, and timber floor covering each require a different approach.
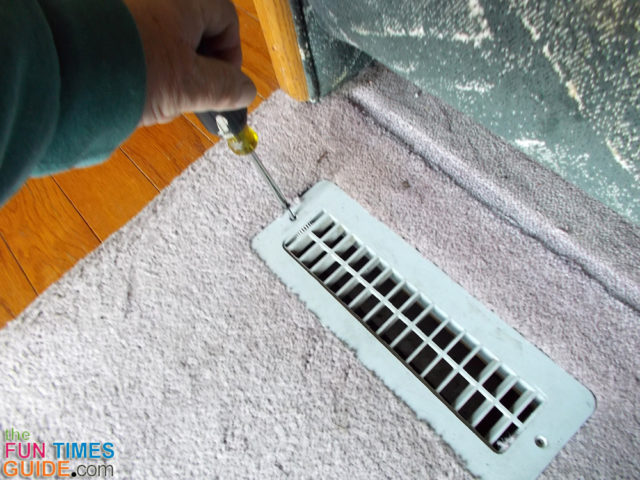
To get rid of the old carpet, adhere to these actions: Cut the carpet right into convenient sections using an utility blade. If your brand-new floor covering set up needs underlayment, you can recycle this. Usage pliers or a rug puller to bring up the carpet areas (hold your horses, as this process can be lengthy because of the number of staples utilized to safeguard the rug) Once all the rug is removed, make use of a staple lifter or oscillating multi-tool to get rid of any type of remaining staples Removing timber flooring is a bit more intricate, but it's nothing a brave DIYer can't deal with.
What does it mean to evaluate the sub-floor? Try to find any signs of damages that can affect the flooring's integrity, such as rot, mold and mildew, or water damage. If you find any type of indicators of water damages, such as discoloration, bending, or mold and mildew, you'll require to address these issues before waging the flooring setup.
If your sub-floor has substantial damages, repairing In some cases, the damage to the sub-floor is so extensive that fixing just the harmed areas isn't sufficient. In these instances, you'll require to replace the whole sub-floor. If this holds true, it can be a much bigger problem and time dedication. While it may be possible to repair on your own, we recommend seeing your local motor home repair work store to determine following steps to make certain the honesty of your floor.
Replacement Rv Refrigerator Norco, CA
This is where your planning and prep work settle, and you start to see your vision end up being truth. It's like reaching the breathtaking forget on your roadway tripthe sight deserves every mile you've driven. To install the floor, you'll need to prepare the surface area, lay the brand-new product, and add the complements.
Before you can lay your brand-new floor covering, you need to make sure that the surface area is all set. This implies making sure it's clean, completely dry, and level. To clean up the surface area: Make use of a vacuum cleaner to remove any kind of dirt and debris Use a moist cloth to wipe down the surface area and get rid of any type of remaining dust Utilize a degree to look for any type of dips or bumps in the surface If there are any type of dips, use a self-leveling compound to fill them in If there are any bumps, use sandpaper to smooth them out By complying with these actions, you can ensure that your brand-new floor covering will lay flat and remain in area.
This last step generally entails mounting trim or molding to conceal any type of exposed edges and give your new floor a refined look. You could likewise need to set up shift strips where different sorts of floor covering meet. Norco Rv Floor Replacement. It's these little details that can make a big difference in the general appearance and feel of your motor home, motorhome, camper, or trailer
Your trip isn't over. Similar to other facets of RV maintenance, maintaining the floor covering in your RV in leading form calls for normal treatment and focus. This consists of routine cleaning, avoiding water damages, and safeguarding high-traffic areas. This makes certain that your flooring stays attractive and functional for years to find.
Awning Installation Norco, CA
Consistently check devices, drains, or various other water resources to spot any kind of leaks or spills. If discovered, quickly address them. It's also essential to make sure adequate air flow in your vehicle to prevent condensation accumulation which can result in mold and mildew and mold. It's all about being proactive and remaining ahead of possible problems.
These areas, like the kitchen area, shower room, and living room, are a lot more prone to damage on your floors and need additional defense to maintain looking its ideal. One method to secure these locations is by utilizing carpets or mats. These not just include a touch of convenience and design, however also work as a barrier between your floor covering and the dust and debris that obtain tracked in.
Consistently inspect for leakages and spills, resolve them immediately, and make certain ample ventilation to stop condensation build-up to protect your brand-new motor home floor. Shield high-traffic locations with rugs, mats, or other safety coverings to lessen damage. Doing this will certainly help keep your brand-new flooring looking great for longer.

With over 25 years of experience we have the skill to give you the very best item to make your recreational vehicle like brand-new once again. We lie near Columbia, South Carolina. We have the ability to replace the flooring on all makes and models of Course A and Class C style Motorhomes, Fifth Wheel RVs, in addition to pull behind style Motor homes with new carpet, wood, and/or vinyl.
Rv Interior Furniture Norco, CA
Replacing the carpet gets rid of old family pet odors, revitalizes the look of your RV by getting rid of matted down carpeting, and when you utilize our specialist installation it will appear like an initial factory installation. Vinyl flooring is likewise simple to maintain clean and among the preferred alternatives for pet dog owners.
If you want to drop in there is a lot of room for multiple motorhomes. It is simple get in and out of our home and to transform your motorhome around on our residential or commercial property. 709 Wren Road, Lexington, South Carolina, 29073.
Purging the fifth wheel carpet! The bulk of the fifth wheel was covered in this dull beige carpet. The germ factor with carpet is additionally not our design.
One was the sides of the slides. The corners are in fact just small items of plastic that expand the aesthetic line of the slide. They're not solid sufficient to hold any type of weight yet we desired to floor to prolong in the exact same style so we were careful to leave them in location.
Rv Sofa Sleeper Norco, CA
Removing this was a cinch compared to the carpet! It came up in huge sheets and was so simple to cut with the energy blade.
Yet the prep job here was so important it was a non-negotiable job! Currently to the fun things! New Floors! We reviewed many short articles, testimonials, and articles regarding which flooring to mount. The two things we were most concerned with were weight and sturdiness. Weight well thats obvious. Nobody intends to add unnecessary weight to their trailer.
Whatever flooring we put down required to stand up to the weight and wear of 2 big slides rolling over it. Its a floating floor that breaks together in slabs. Its waterproof, has an anti-microbial surface, cork support and can be reduced with an easy energy blade.
Replace Rv Flooring Norco, CA
Simply measure, reduce, and snap in position. The truth we did the entire point with just an energy blade wound up being a massive perk! The floor of the 5th wheel had so several weird angles and limited areas I just cant think of how crazy the cuts would certainly have gotten on a saw.
In the beginning I wanted everything to match yet as you can see the slides are extremely different so that had not been going to work. The tiny location before the fire place was a continuation of the cooking area which has a thick white base. After seeing both choices in person it was clear white was best.
For the living-room slide we opted for an unfinished oak stairway trim from Home Depot. At initially we thought we would certainly stain it to match but it became the very same shade as our furniture legs(much more on that particular soon!) Its most likely going to be left as-is.
Rv Couch Bed Norco, CA
One was the sides of the slides. The edges are in fact simply tiny items of plastic that prolong the aesthetic line of the slide. They're not strong sufficient to hold any type of weight however we wanted to flooring to extend in the exact same style so we were mindful to leave them in position.
This was only in a tiny component of the kitchen area, corridor, and shower room. Removing this was a cinch compared to the rug! It showed up in huge sheets and was so simple to reduce with the utility blade. When whatever was out I got rid of regarding a billion staples and all the remnants I can obtain a hold of along the sides.
Rv Dinette Booth Norco, CA
The prep work below was so crucial it was a non-negotiable work! Now to the enjoyable stuff! New Floors! We checked out so several write-ups, testimonials, and posts about which flooring to set up. The two things we were most concerned with were weight and durability. Weight well thats evident. No one wants to include unnecessary weight to their trailer.
Whatever floor we placed down needed to hold up against the weight and wear of 2 massive slides rolling over it. Its a floating floor that breaks with each other in planks. Its water resistant, has an anti-microbial coating, cork backing and can be reduced with an easy energy blade.
Rv Sofa Beds Norco, CA
Simply measure, reduce, and break in place. The reality we did the entire point with just an energy blade finished up being a significant perk! The floor of the fifth wheel had so numerous strange angles and tight areas I just cant think of exactly how crazy the cuts would certainly have been on a saw.
At initial I desired whatever to match yet as you can see the slides are really various to make sure that had not been going to work. The small area in front of the fireplace was an extension of the kitchen area which has a thick white base. After seeing both choices personally it was clear white was best.
For the living-room slide we chose an unfinished oak stairway trim from Home Depot. Initially we thought we 'd stain it to match yet it ended up being the very same color as our furnishings legs(much more on that particular quickly!) Its most likely going to be left as-is.
Remodeling Rv Norco, CARv Sofas Norco, CA
Rv Microwave Replacement Norco, CA
Rv Microwave Replacement Norco, CA
Motorhome Carpets Norco, CA
Rv Dinette Table Norco, CA
Replacement Rv Windows Norco, CA
Awning Installation Norco, CA
Rv Restoration Companies Norco, CA
Rv Upholstery Norco, CA
Rv Couch Norco, CA
Rv Sofas Norco, CA
Rv Replacement Furniture Norco, CA
Rv Replacement Furniture Norco, CA
Remodeling Rv Norco, CA
Awning Installation Norco, CA
Rv Sofa Sleeper Norco, CA
Rv Interior Furniture Norco, CA
Rv Microwave Replacement Norco, CA
Motorhome Carpets Norco, CA
Rv Sofa Sleeper Norco, CA
Rv Couch Norco, CA
Rv Replacement Awnings Norco, CA
Rv Refrigerator Replacement Norco, CA
Rv Couch Norco, CA
Replacement Windows For Campers Norco, CA
Rv Refrigerator Replacement Norco, CA
Rv Sofas Norco, CA
Awnings For Trailers Norco, CA
Awning Installation Norco, CA
Rv Couch Bed Norco, CA
Replacement Rv Refrigerator Norco, CA
Rv Interior Remodel Norco, CA
Awnings For Rv Norco, CA
Rv Couch Bed Norco, CA
Rv Chairs Norco, CA
Rv Couch Bed Norco, CA
Rv Couch Norco, CA
Awnings For Trailers Norco, CA
Rv Couch Norco, CA
Rv Dining Table Norco, CA
Remodeling Rv Norco, CA
Rv Carpet Installation Norco, CA
Remodeling Rv Norco, CA
Replacement Windows For Campers Norco, CA
Replace Rv Flooring Norco, CA
Replacement Windows For Campers Norco, CA
Rv Dining Table Norco, CA
Rv Upholstery Norco, CA
Rv Couch Bed Norco, CA
Awnings For Trailers Norco, CA
Rv Dinette Table Norco, CA
Replacement Windows For Campers Norco, CA
Rv Microwave Replacement Norco, CA
Rv Refrigerator Replacement Norco, CA
Rv Replacement Awnings Norco, CA
Replace Rv Flooring Norco, CA
Rv Upholstery Norco, CA
Replacement Rv Windows Norco, CA
Rv Carpet Replacement Norco, CA
Rv Restoration Companies Norco, CA
Rv Interior Furniture Norco, CA
Rv Dinette Table Norco, CA
Rv Sofa Beds Norco, CA
Rv Chairs Norco, CA
Awning Installation Norco, CA
Replacement Windows For Campers Norco, CA
Remodeling Rv Norco, CA
Rv Replacement Furniture Norco, CA
Rv Upholstery Norco, CA
Rv Sofa Beds Norco, CA
Awnings For Trailers Norco, CA
Remodeling Rv Norco, CA
Awnings For Rv Norco, CA
Rv Microwave Replacement Norco, CA
Rv Sofa Sleeper Norco, CA
Rv Carpet Installation Norco, CA
Replacement Rv Refrigerator Norco, CA
Close To Me Seo Package Norco, CA
Finding A Seo Marketing Norco, CA
OCRV Center
Table of Contents
- – Rv Replacement Awnings Norco, CA
- – OCRV Center
- – Rv Dinette Booth Norco, CA
- – Rv Dinette Table Norco, CA
- – Rv Upholstery Norco, CA
- – Rv Dinette Booth Norco, CA
- – Replacement Rv Refrigerator Norco, CA
- – Awning Installation Norco, CA
- – Rv Interior Furniture Norco, CA
- – Rv Sofa Sleeper Norco, CA
- – Replace Rv Flooring Norco, CA
- – Rv Couch Bed Norco, CA
- – Rv Dinette Booth Norco, CA
- – Rv Sofa Beds Norco, CA
- – OCRV Center
Latest Posts
Low Cost Dental Services For Seniors Without Insurance Fullerton
Insurance For Seniors Dana Point
Anaheim Payroll Service For Small Business
More
Latest Posts
Low Cost Dental Services For Seniors Without Insurance Fullerton
Insurance For Seniors Dana Point
Anaheim Payroll Service For Small Business